Rendering 1: Rendering a scene
[1] Introduction
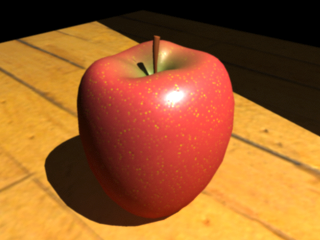
This lesson provides a brief introduction to rendering in Maya. In this lesson, you learn how to:
Assign shading materials to surfaces in the scene.
Edit the color of shading materials.
Apply simple textures to shading materials.
Render both a single image and a sequence of images for an animation.
Use Interactive Photorealistic Rendering (IPR) to perform test renders of the scene.
Edit the Render Settings attributes to change the quality of the final results of an image.
View a sequence of rendered frames for an animation.
[2] Open the scene for the lesson
In this lesson, you render a scene we’ve created for your use.
Make sure you’ve done the steps in Preparing for the lessons.
Open the scene file named apple.mb .
This file can be found in the GettingStarted2015LessonData\Rendering directory that you set as your Maya project:
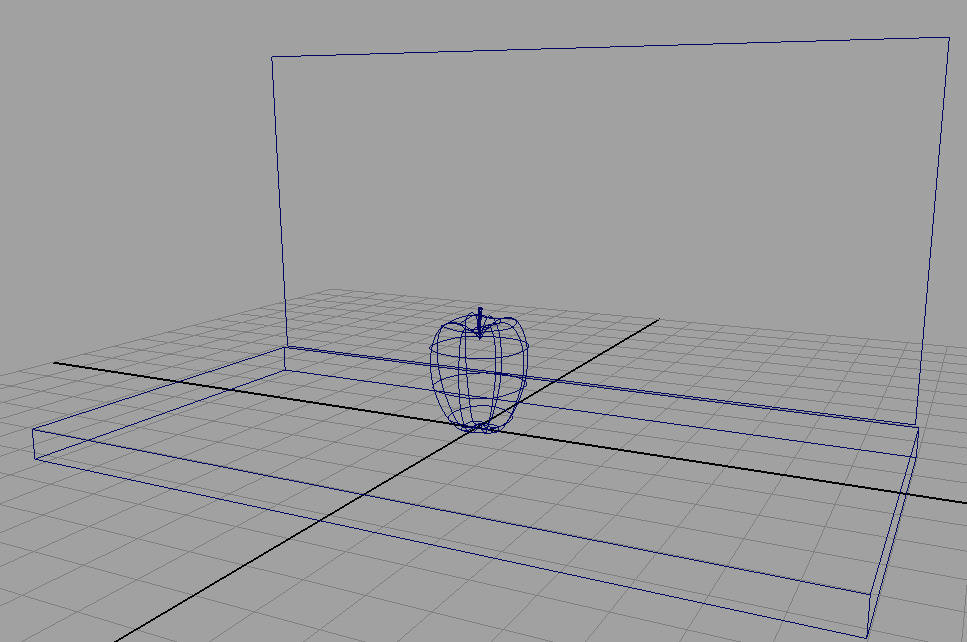
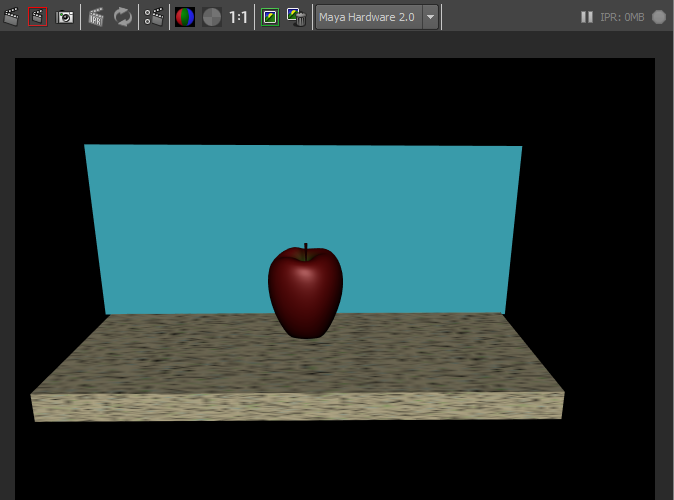
The scene contains an apple sitting on a plane, with another plane as the background. A camera in the scene is animated to revolve around the apple at varying distances. (As an alternative to using the scene apple.mb, you can create a similar scene with your own objects.)
Select Renderer > Viewport 2.0 from the panel menus.
You will view the scene view through the Viewport 2.0 renderer.
IMPORTANT:In order to use Viewport 2.0 , you must use a graphics card that is Viewport 2.0 compliant. For a list of certified hardware, please see http://www.autodesk.com/hardware.
Select Window > Settings/Preferences > Preferences.
Click the Time Slider category and make sure the Playback speed option is set to Real-time (24 fps) so your animation will playback at the default rate of 24 frames per second.
Close the Preferences window.
You won’t use the animated camera until later in the lesson. In the next steps, you color the apple and the planes by creating shading materials.
[2] Creating shading materials for objects
A shading material is a collection of attributes that you apply to a surface to control how the surface appears when it is rendered. Shading materials include such attributes as color, shininess, and texture. The following table outlines the materials you’ll be working with:
| Material | Description |
| Lambert | Creates a matte surface without specular highlights. Lambert is the default shading material. |
| Phong | Creates a shiny surface with specular highlights, often used to simulate metallic surfaces. |
When you open the apple.mb file, it initially displays the apple and the planes as wireframes (Shading > Wireframe). This is the default display mode for objects in a scene view.
To create materials for the apple stem
In the perspective view, select Shading > Smooth Shade All (hotkey: 5).
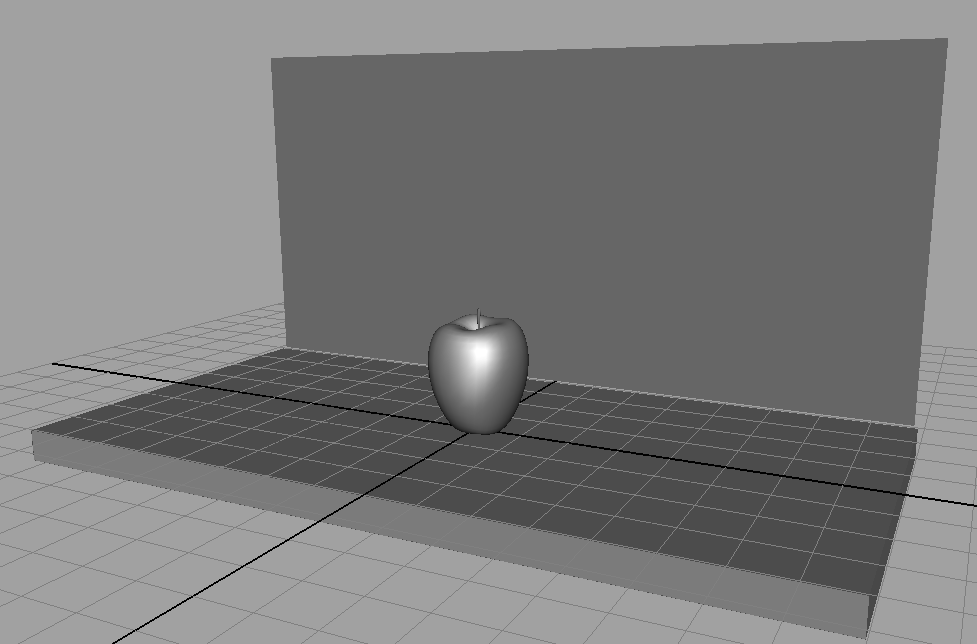
The apple and the other surfaces appear with a default gray, smooth shading material, lit using default lighting. Default lighting occurs when no other lights have been placed in the scene.
In the perspective view, select the apple stem by clicking its geometry. (Be sure that only the apple stem is selected.)
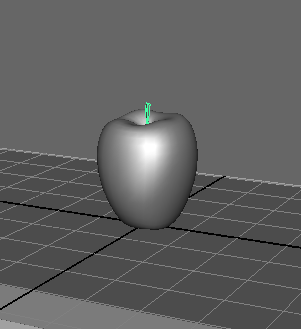
From the Rendering menu set, select Lighting/shading > Assign New Material.
The Assign New Material window appears.
Click Lambert.
The Attribute Editor appears for the Lambert material.
A Lambert material creates a matte surface without shiny highlights. You will learn more about materials and their attributes in a later lesson.
Click the gray box to the right of Color.

The Color Chooser window appears.
Click inside the color wheel and drag to a brown color.
The color you select in the Color Chooser is applied to the apple stem.
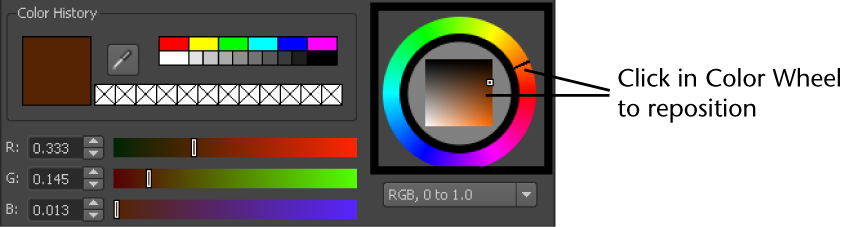
Move your mouse off the Color Chooser to exit.
In the Attribute Editor, rename the lambert shading material to appleStem_lambert.
To create materials for the apple
Right-click the apple and select Assign New Material from the marking menu.
The Assign New Material window appears.
NOTE:Make sure you have the apple selected and not the stem or the new material and color will be assigned to the stem.
Select Phong.
The Attribute Editor updates to display the attributes for the Phong material.
A Phong material gives the apple a shiny appearance.
Click the gray box to the right of Color.
The Color Chooser window appears.
Click inside the color wheel and drag to a red color.
The apple’s surface updates to the same color you select in the Color Chooser.
In the Attribute Editor, rename the Blinn shading material to appleSkin_blinn.
To create materials for the counter and wall
Right-click the background plane and select Assign New Material from the marking menu.
The Assign New Material window appears.
NOTE:Make sure you have the background plane selected and not the apple or the new material and color will be assigned to the apple.
Select Lambert.
The Attribute Editor displays the attributes for the Lambert material.
Click the gray box to the right of Color.
In the Color Chooser window, click inside the color wheel and drag to a light blue color.
The color you select in the Color Chooser is applied to the plane.
In the Attribute Editor, rename the Lambert shading material to wall_lambert.
Right-click the surface that the apple is resting on and select Assign New Material > Lambert.
The Attribute Editor displays the attributes for the Lambert material.
NOTE:Make sure you have the surface plane selected and not the background plane or the new material and color will be assigned to the background plane.
Click the gray box to the right of Color.
In the Color Chooser window, click inside the color wheel and drag to a beige color.
The color you select in the Color Chooser is applied to the plane.
In the Attribute Editor, rename the Lambert shading material to counter_lambert.
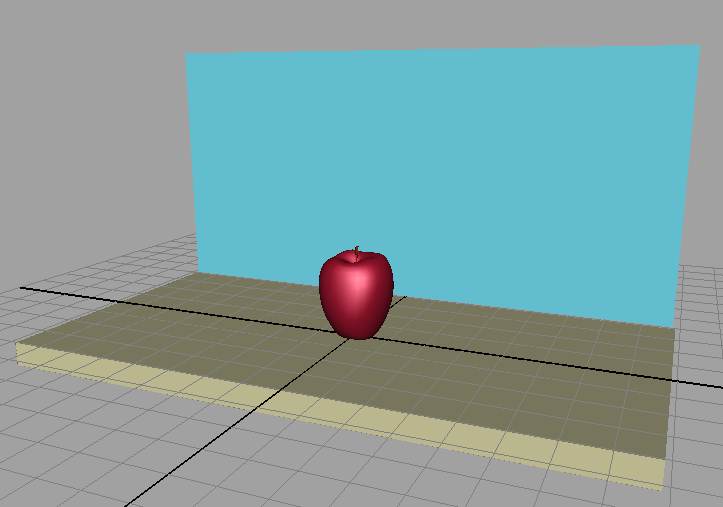
The counter, wall, and apple stem all have a matte Lambert surface, while the apple has a shiny Phong surface. There are many other attributes you can set to change the appearance of these objects, which you’ll explore in the next section.
[3] Refining shading materials for objects
You can refine the shading materials in the scene to make the objects appear more realistic. In the next steps you connect (or apply) a procedural texture to the counter, and a ramptexture to the apple. These textures are connected to the color attribute of the shading material for each surface to provide natural surface variation. When you connect textures, you create shading networks. You’ll learn more about shading networks in a later lesson.
A procedural texture is a 2D or 3D texture calculated based on an algorithm or mathematical formula. It can be useful for creating random patterning. A ramp texture is a 2D texture or color gradient in which the color or grayscale value changes across the image.
To connect a procedural texture to the counter surface
In the perspective view, right-click the counter surface and select Material Attributes.
The Attribute Editor for the counter_lambert material appears.
To the right of the Color slider, click the Map button

The Create Render Node window appears and lists the various textures you can connect to the Color attribute of the Lambert material assigned to the counter surface.
In the Create Render Node window, select Maya > 3D Textures > Granite.
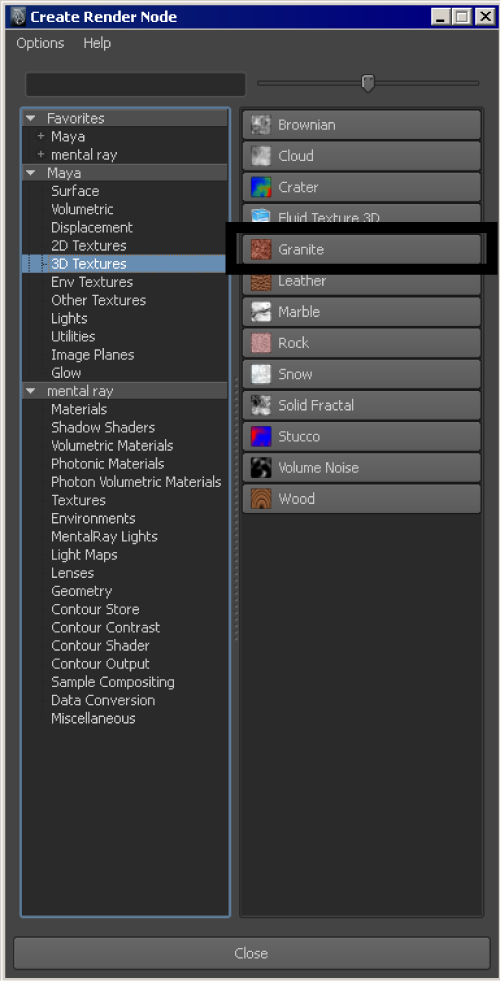
The procedural texture gives the counter the look of a stone granite counter top when it is rendered, and provides the context for the scene.
In the Attribute Editor, under Granite Attributes change the Filler Color from the default reddish-brown to a beige color as follows:
Click the color box to the right of Filler Color.
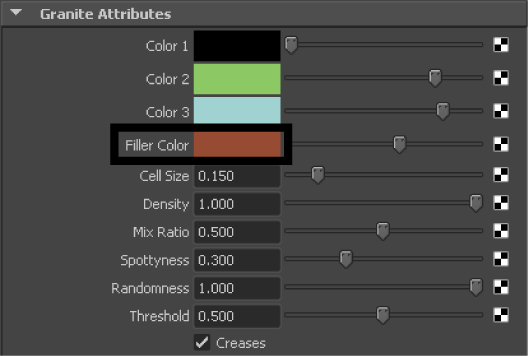
In the Color Chooser window, select a beige color.
Press 6 to view the workspace in textured mode to see visualize the granite texture in the scene view.
To connect a ramp texture to the apple surface
Right-click the apple and select Material Attributes from the marking menu.
The Attribute Editor updates to display the appleSkin_blinn material properties.
To the right of the Color slider, click the Map button.

The Create Render Node window appears and lists the various texture patterns you can connect to the Color attribute of the Blinn material assigned to the apple.
Select Maya > 2D textures > Ramp.
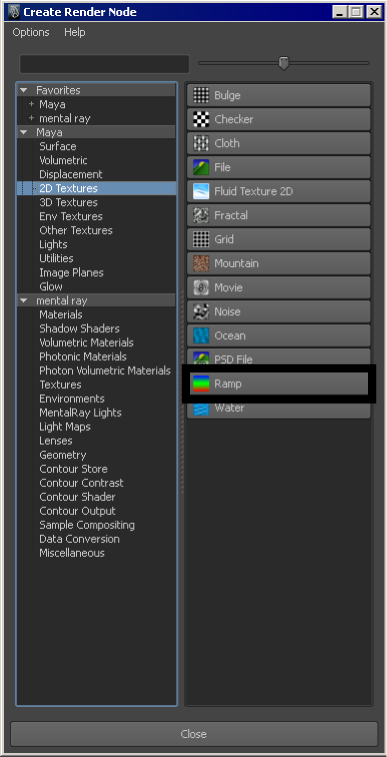
This texture creates a gradation through a series of selected colors. Applying the ramp texture provides the apple with a realistic variation in surface color.
In the Attribute Editor, under Ramp Attributes, change the Type to U Ramp.
The Ramp Type indicates the direction of the color gradient. A U ramp applies the gradient in a linear, vertical direction across the object.
Add another color component by clicking within the ramp.
A new set of color handles appears in the ramp, for a total of four color components.
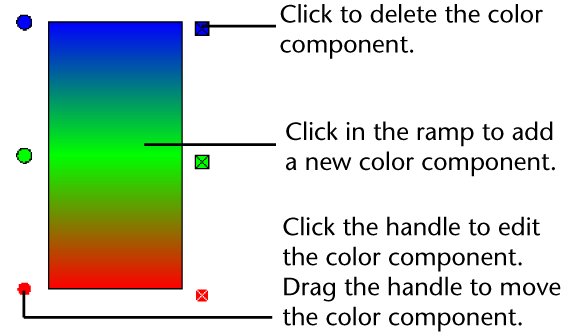
To change the ramp colors, click the top circular color handle (to indicate which color you want to modify), then click the color box to the right of Selected Color to display the Color Chooser window.
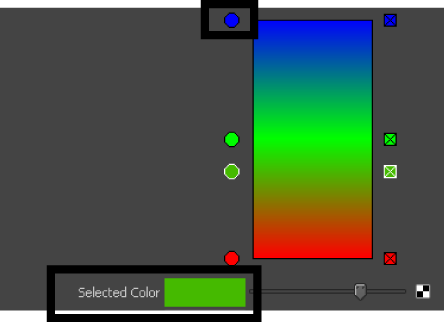
Click inside the color wheel and drag to a very dark brown for the first ramp color.
Repeat steps 6 and 7 for the other three ramp colors. For the two middle ramp colors, select a dark red. For the last ramp color, select a deep olive green.
Use the circular color handles to reposition each component as shown below:
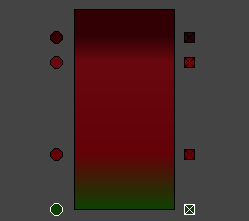
The position of these handles and the corresponding colors affect the location and breadth of the color within the gradient on the apple’s surface.
Save your work.
In the next section you render your scene to view the textures and materials you’ve assigned to the objects.
[4] Maya renderers
So far, you’ve seen the results of shading the apple and other surfaces in the scene view. In this view, Maya uses your computer’s graphics hardware to display the shading and textures.
Next, you use a renderer to create your final rendered images. In this lesson, you explore Interactive Photorealistic Rendering (IPR) as well as rendering using the Maya Hardware 2.0 renderer.
Rendering time is dependant on the complexity of surface geometry, shaders, lighting and other visual elements present in the scene.
The following table outlines the different types of renderers in Maya and what each is used for:
| Renderer | Use |
| mental ray® for Maya® renderer | A general purpose renderer that includes exclusive, advanced rendering functionality, such as host and network parallel rendering, area light sources for soft shadows, global illumination, and caustics (light patterns). |
| Maya’s Software renderer | A general purpose renderer with broad capabilities. You can produce high-quality images with complex shading networks, including procedural textures and ramps. Software rendering is computed through your machine’s processor. |
| Interactive Photorealistic Rendering (IPR) | A feature of Maya’s software renderer and mental ray for Maya renderer, used to make interactive adjustments to the final rendered image. You can adjust shading and lighting attributes in real-time, and IPR automatically updates the rendered image to show the effects of your changes. IPR is useful for tweaking an image before rendering to disk. |
| Maya Vector renderer | A specialized renderer used to produce stylized renderings (for example, cartoon, tonal art, line art, hidden line, wireframe) in various bitmap image formats (IFF, TIFF) or in 2D vector formats (SWF, AI, EPS, SVG). The Maya Vector renderer is often used to render web-ready images. |
| Maya’s Hardware renderer | A general purpose renderer that uses your machine’s graphics card for computation. You can produce broadcast resolution images in less time than with software rendering, and in some cases, the quality may be good enough for final delivery. |
The Render View window
When you render your scene the rendered image appears in its own window called the Render View. By default, the Render View uses the same camera as the Scene View (persp), but includes particular rendering capabilities.
The following table shows the differences between the Render View and the Scene View:
| Scene View | Render View | |
| Display | 3D object scene | 2D rendered image |
| Surfaces | modeled surfaces, the grid, vertices, curves, and object manipulators | shaded surfaces only |
| Background | default gray background | black background by default because only objects with materials that are lit can be seen |
| Quality | lower quality and fidelity | high-quality, colors and textures appear in their final rendered form |
[5] Rendering a single frame using IPR
In this section, you work with IPR (Interactive Photorealistic Rendering) for mental ray rendering.
The advantage of rendering with IPR is that, after you render an image, you can adjust the shading and lighting attributes of the scene and then quickly update part or all of the rendered image to review the effect of your changes. IPR is useful for iterations when you need to fine-tune specific attributes. Updates to the image are not always instantaneous, but they are full quality.
Using the mental ray for Maya renderer
To use IPR for mental ray rendering, you must first select the mental ray for Maya renderer.
To turn on the mental ray for Maya renderer
In the main menu, select Window > Rendering Editors > Render Settings (or click the Render Settings icon in the Render View window).

In the Render Settings window, set Render Using setting to mental ray .
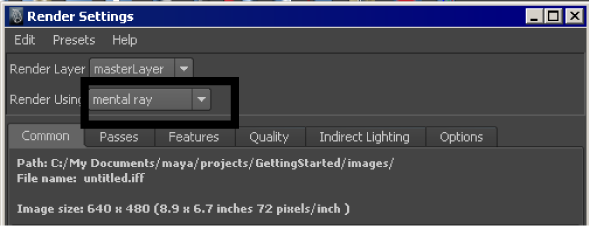
NOTE:If mental ray does not appear under the list of renderers, you must load the mental ray plug-in via the Plug-in Manager. Select Window > Settings/Preferences > Plug-in Manager and select Loaded for the Mayatomr.mll plug-in.
To render the scene using IPR
In the perspective view, select View > Camera Attribute Editor to display the attributes for the camera.
You need to specify the exact region of the perspective view you want to render.
In the Attribute Editor, open the Display Options section and turn on Display Resolution.
A grey rectangular border shows the region to be rendered. This region defines the area of the final image, and allows you to decide what appears or does not appear in the final image. (The left and right borders of the rectangle may be positioned at the edge of the window.)
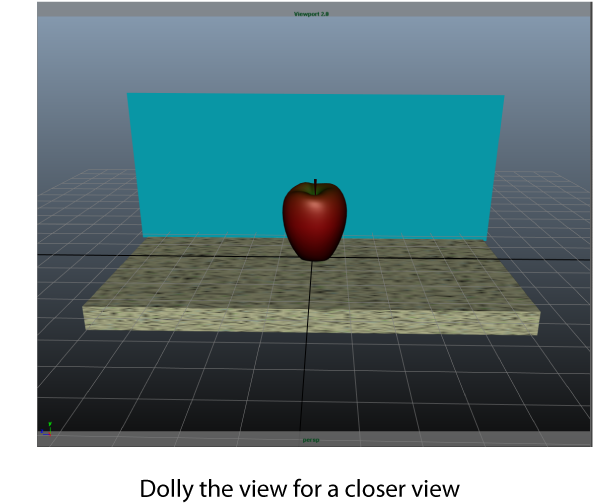
Select Render > IPR Render Current Frame (or select the IPR render current frame button on the Status Line).
The Render View appears as follows.
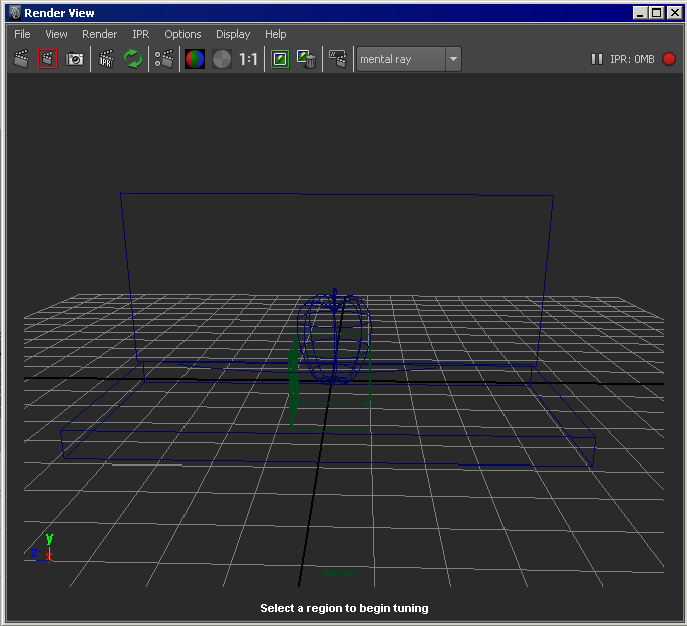
The message displayed at the bottom of the IPR Render View window states “Select a region to begin tuning”. In the next step, you create a subregion of the image to render using IPR.
In the Render View, select View > Frame Image to resize the Render View window so it fits closely to the rendered image.
To select a subregion to render using IPR
In the Render View, drag a selection box around the small area surrounding the apple, counter, and wall as shown:
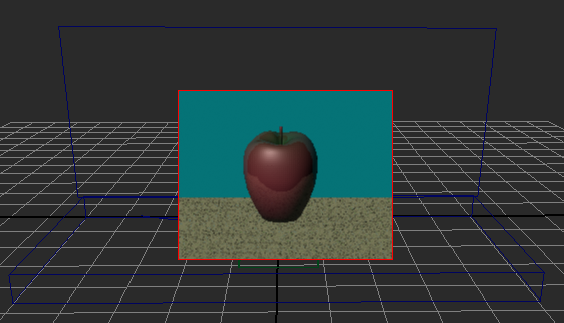
When using IPR, this selected region updates as you alter any shading, texture, or lighting attributes. Selecting a smaller region quickens the update. You can select regions throughout the image to see those areas update.
In the scene view, right-click the wall and select Material Attributes to display the Attribute Editor for the Lambert shader you applied to the wall.
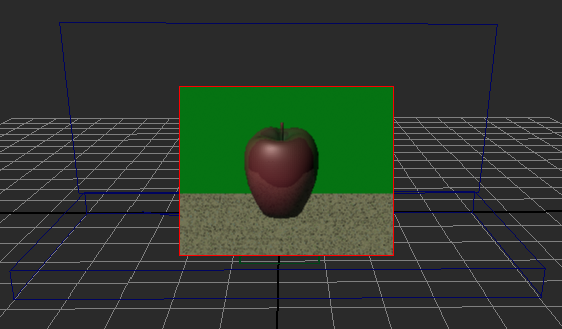
Click the Color box and change the color to green.
The area within the selected region of the Render View updates immediately as you alter the color; the wall turns green.
When you drag within the color wheel of the Color Chooser window, the selected region updates occur immediately.
NOTE:
If the region does not update, in the Render Settings window, turn the Raytracing option off.
(You won’t alter any other attributes in this lesson. The purpose of the lesson is to learn the process of rendering, not to perfect the results at this point.)
So far, you’ve used IPR to see changes you made to a shader. If you add lights to the scene rather than use the default lighting, you can also use IPR to help adjust the lighting.
[6] Rendering a single frame using Maya Hardware
In this section, you render the current frame using Maya Hardware 2.0.
Maya Hardware 2.0 allows you to set many options for your render, such as the object type filter (for example, if you only want to render your polygons and lights and exclude your cameras), to set the gamma correction, enable ambient occlusion or anti-aliasing and so forth.
Using Maya Hardware 2.0
To turn on the Maya Hardware 2.0 renderer
In the main menu, select Window > Rendering Editors > Render Settings (or click the Render Settings icon in the Render View window).

In the Render Settings window, set the Render Using setting to Maya Hardware 2.0.

Selecting Maya Hardware 2.0 options
Click the Maya Hardware 2.0 tab to view the available options.
Setting the object type filter
Expand the Batch Render Options section and then the Object Type Filter section.
De-select all options with the exception of NURBS Surfaces and Polygons to render only your apple model, the counter top plane and the wall plane.
Enabling anti-aliasing
Expand the Multisample Anti-aliasing section.
Select Enable to enable anti-aliasing.
Select 16 from the Sample Count drop-down box. Depending on your graphics card, this may be the highest level of anti-aliasing.
Rendering the frame
Click

in the status line to render the current frame.
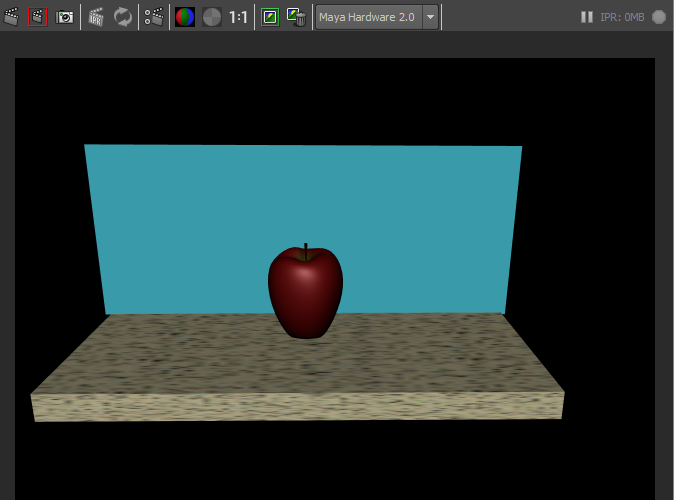
You can re-adjust the anti-aliasing Sample Count, or experiment with the other options as you like, and re-render to see the difference in results.
[7] 2.0 Rendering using the Maya Hardware 2.0 renderer Batch
In this section, you render the entire animation to disk. You must first switch camera views so you can render the scene from the point of view of the camera that was animated for this lesson. When animating a camera it’s a good practice to create a second camera to animate, rather than animating the default persp camera. In that way you can return to the default perspective view should it become necessary.
Rendering the entire animation can take a lot of time, so it is useful to first test render a few frames to your monitor and examine the results.
Once you are satisfied with the quality of a few rendered frames, you can render the entire animation to disk.
To switch camera views and playback the animation
In the perspective view, select Panels > Perspective > apple_camera.
The view updates to display the scene as seen through the lens of the apple_camera.
Click the Play button in the Timeslider playback controls.
During playback, the animated camera tracks and tumbles about the apple.
Stop the animation at a frame you want to test render.
To test render the current frame of animation
In the Render View window, select Maya Hardware 2.0 from the drop-down list.
Select Render > Render > apple_camera.
This menu item uses the hardware 2.0 renderer to render a single frame of the scene from the point of view of the animated apple_camera.
Go to frame 120 of the animation, where the apple is viewed in a different position.
In the Render View, select Render > Render > Current (apple_camera).
Ensure that the rendered image looks good at this frame also.
Now that you’ve checked a pair of rendered frames that represent the entire animation, you are ready to render the entire animation sequence. In your own projects, you might want to test render several frames, particularly where new shading and lighting elements occur in the animation.
[8] rendering a sequence of animation frames
After you model, animate, and color your scene, you set several Render Settings options and then use the mental ray renderer to batch render part or all of the animation’s range of frames to files on disk. Each file represents a single frame (image) of the animation.
To set the Render Settings for batch rendering
In the Render View window, select Options > Render Settings to display the Render Settings window.
In the Render Settings window, select the Common tab.
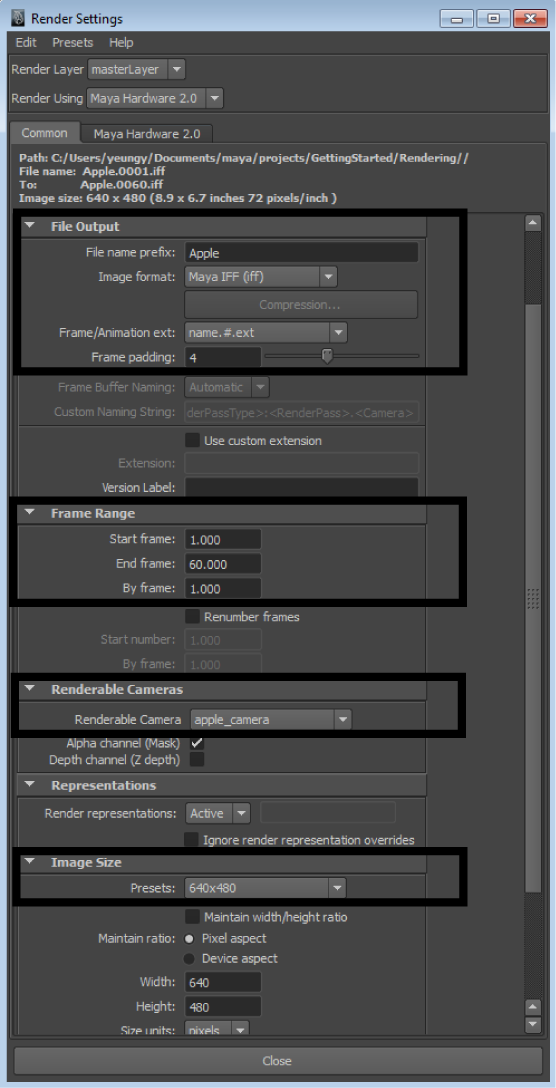
In the File Output section, set the following options:
File Name Prefix: Type the name Apple. This name will be the base of the filenames created by batch rendering.
Image Format: Select Maya IFF (.iff), Maya’s standard image file format. You can use the .iff format for any further work you need to do, including previewing and compositing the animation. If you require a different format, you can specify it instead of .iff in the Render Settings.
Frame/Animation ext: Select name.#.ext. This specifies that the filenames will have the format prefix.frameNumber.fileFormat. For example, batch rendering the entire 200-frame animation will create Apple.0001.iff, Apple.0002.iff, and so on through Apple.00200.iff.
Frame padding: Enter 4. This causes the frameNumber part of the filenames to be four digits prefixed with 0s. For example, the filenames will be Apple.0001.iff through Apple.0200.iff.
The four-digit padded filename is compatible with many image playback programs, for example, Maya’s FCheck utility. Image playback programs let you view rendered animation sequences on your monitor at real-time speed.
In the Frame Range section, set the following options:
Start frame: Enter 1, the first frame of the animation sequence to be batch rendered.
End frame: Enter 60, the last frame to be batch rendered. (Rendering all 200 frames may be time-consuming.)
In the Renderable Cameras section, set the following option:
- Renderable Camera: Select apple_camera from the drop-down list to indicate which camera view to render.
In the Image Size section, select 640x480 from the Presets drop-down list.
For the remaining options in the Render Settings window, you’ll use the default settings.
After you set the Render Settings, the top portion of the Common tab shows the correct path and filenames for the files to be created during batch rendering. Check that this information is correct.
Close the Render Settings window.
To batch render animation frames
Save the scene.
It’s a good practice to save the scene before batch rendering. This is useful if, after batch rendering, you need to change any display settings and render again. By saving the scene prior to batch rendering, you can examine the scene to learn which option settings were in effect at the time you batch rendered.
From the Rendering menu set, select Render > Batch Render.
Batch rendering 60 frames of a simple scene takes a few minutes. A complex scene may take hours per frame, depending on the speed of your computer.
To check the status of the batch render
While Maya is rendering, select Window > General Editors > Script Editor. Expand the size of the Script Editor window. The window shows a completion log for the frames being rendered.
Maya puts the resulting files in a default images directory. The files have the following names:
 Apple.0001.iff
 Apple.0002.iff
 Apple.0003.iff
 ...
 ...
 Apple.0050.iff
The images directory is located in the same path as the scenes directory. You can have Maya save to a different path by changing the project setting. See the Maya Help for further information on projects.
Close the Script Editor when the following message appears:
// Result: Rendering Completed. See mayaRenderLog.txt for information. //
The mayaRenderLog.txt file contains rendering statistics for advanced users.
[9] Viewing a sequence of rendered frames
You can use Maya’s FCheck image viewing utility to view the batch-rendered images at a speed that approximates video or film.
To use FCheck to view a sequence of rendered frames
Select File > View Sequence.
The File Browser window appears.
Using the File Browser, navigate to the images directory for your current project (or wherever you saved the rendered sequence of images for the Apple).
Click the image file Apple.0001.iff to select the first image in the sequence and then click Open.
The FCheck image viewing utility appears and the rendered sequence of 60 frames plays back as an animated loop.
Close the window after viewing the animation.NOTE:
The FCheck rendering utility has playback, display, and other options you can select from your keyboard. Details are available from the FCheck Help menu.
[10] Beyond the lesson
In this lesson, you were introduced to some of the basic concepts for rendering an image. In this lesson you learned that:
Surfaces are assigned shading materials to provide basic attributes such as color, shininess, reflectivity, and so on. Each shading material has unique characteristics that can be modified to suit your requirements.
You can additionally assign a texture map to some of the shading material attributes so that your objects appear more realistic.
Maya provides several methods for rendering an image. You can render using the mental ray® for Maya® renderer, the Maya Software renderer, the Maya Hardware renderer, or the Maya Vector renderer. Each type of renderer has specific advantages and uses.
You can choose the size and quality for a rendered image prior to rendering based on your specific needs and requirements.
You can render a single image or a sequence of images from an animation.
You can view one image, or a sequence of rendered frames using the FCheck utility.
As you render scenes, consider the following issues:
Batch rendering
In this lesson, you used the Maya Hardware 2.0 renderer to check the image quality of two frames before you started to batch render. When you create scenes with sophisticated animation, it’s useful to batch render with low-quality resolution to check the animation accuracy before batch rendering with production-quality resolution. For instance, you might preview your animation with the frames resulting from batch rendering at a small image size (320 by 240) or with a lower anti-aliasing sample count.
You don’t need to use the batch renderer to render single frames from your scene to disk. From the Render View window, select File > Save Image.
Hardware rendering
Hardware rendering leverages the power provided by hardware graphics cards to render your images. The benefits of hardware rendering include the ability to batch render frames more quickly than with software rendering, and rendering specific particle effects not possible through software rendering. For more information about hardware rendering particles, see Rendering particles in the Maya User Guide.
Hardware rendering is used in the scene view, and Viewport 2.0 allows for high interactivity for complex scenes with many objects as well as large objects with heavy geometry. You can also batch render using this hardware renderer by selecting the Maya Hardware 2.0 renderer from the Render Settings window.
Hardware rendering has its own limitations when compared to software rendering. For more information on hardware rendering, see the Maya Help.
Using render passes
It's often useful to render attributes of your scene in different passes and combine them using compositing software. When using the mental ray for Maya renderer, you can render each of diffuse, shadow, reflection, specular, and ambient occlusion in a separate pass and then composite the passes afterwards. You can select a subset of the objects or lights in your scene to contribute to each render pass. You can render an unlimited number of render passes, and then group them into logical groups called render pass sets. For more information about render passes, see Multi-render passes in the Maya User Guide.
About the author
Mohamad's interest is in Programming (Mobile, Web, Database and Machine Learning). He is studying at the Center For Artificial Intelligence Technology (CAIT), Universiti Kebangsaan Malaysia (UKM).
Comments
Join the discussionNo comments yet. Be the first to comment.