Animation 3: Path animation
Mohamad's interest is in Programming (Mobile, Web, Database and Machine Learning). He is studying at the Center For Artificial Intelligence Technology (CAIT), Universiti Kebangsaan Malaysia (UKM).
[1] Introduction
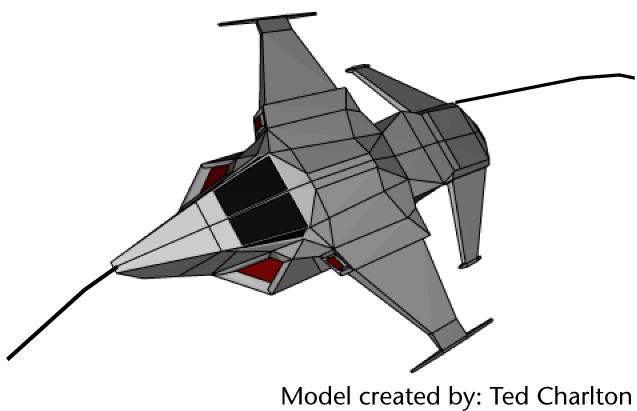
Path animation allows you to animate an object along a path specified by a curve. In this way, the curve controls the motion of the object. With keyframe animation, Maya calculates the motion of the object for the animation based on the positions that were set at the keyframes. With path animation the motion for the object is defined by its location along the path curve.
Path animation is useful for animating objects such as trains, boats, airplanes, and moving cameras whose motion follows a set path. To animate an object to do this type of motion smoothly with keyframe animation would require you to laboriously create and edit many keys for the motion. By having the object move along a curve, you can easily adjust the object’s path by editing the curve.
In this lesson, you make an aircraft follow a motion path so it appears to fly and bank while it changes trajectory.
In this lesson, you learn how to:
Set an object to animate along a motion path using a NURBS curve as the path.
Modify the timing and rotation of an object along a motion path.
Blend between keyframe and motion path animation.
[2] Open the scene for the lesson
In this lesson, you work with a scene we created for your use.
Make sure you’ve done the steps in Preparing for the lessons.
Open the scene file named PathAnim.mb.
This file can be found in the GettingStarted2015LessonData directory that you set as your Maya project.
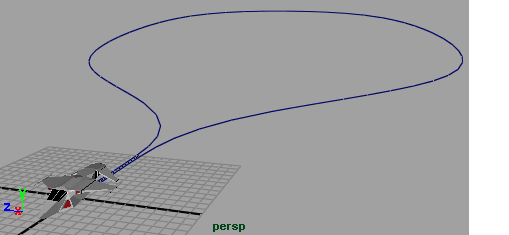
The scene contains two objects named Aircraft and PathCurve. When the aircraft travels on the path curve it will return to where it began.
In the Time Slider, ensure that the Playback End Time is set to 240.
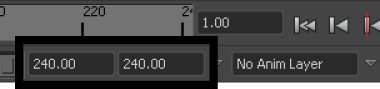
The path animation occurs between frames 60 and 240 (180 frames in total). Between frames 1 and 60, you keyframe the aircraft’s motion so it rises from the ground plane. You then blend between the two animation types.
[3] Animating an object along a motion path
To animate the aircraft along the path curve, first select the aircraft and the path curve and then set appropriate options for the motion path animation. In the options window, you need to set the required time range for the path animation. You also need to ensure that the aircraft is oriented facing towards the direction of travel. The Follow, Front, and Up axis option settings determine the aircraft’s orientation along the path.
To attach the aircraft to the motion path
Go to frame 1 on the Time Slider.
Select the aircraft and then Shift-select the path curve.
In the main menu, select Animate > Motion Paths > Attach to Motion Path >☐.
The Attach to Motion Path Options window appears.
In the options window, ensure the options are set as follows, then click Attach:
Time Range: Start/End
Start time: 60
End time: 240
Follow: On
Front Axis: X
Up Axis: Y
World up type: Scene up
Leave all other settings off
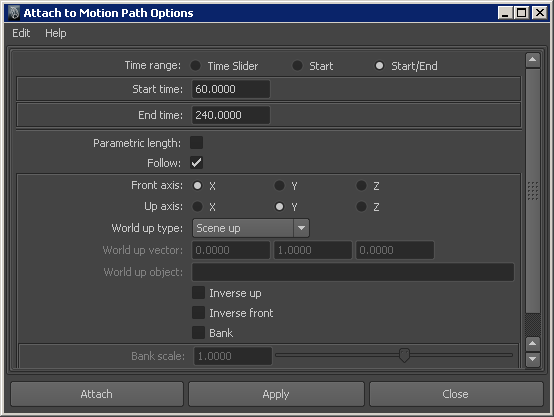
Click Attach.
The aircraft is repositioned to the start of the curve, and oriented towards the direction of travel.
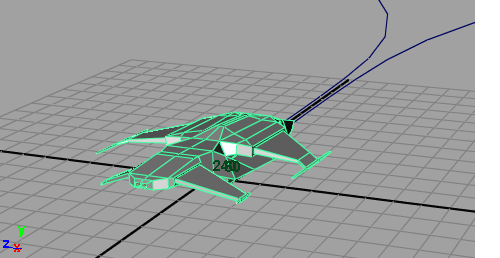
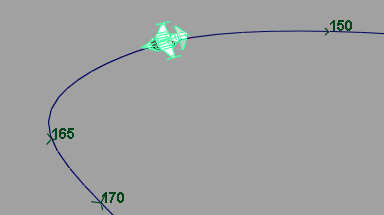
The Start and End times set the time duration the aircraft travels along the path curve (240 - 60 = 180 frames). The start and end times are displayed at the ends of the curve.
Click play on the Time Slider playback controls to play back the animation.
The aircraft travels along the path. Observe that it begins its motion at frame 60.
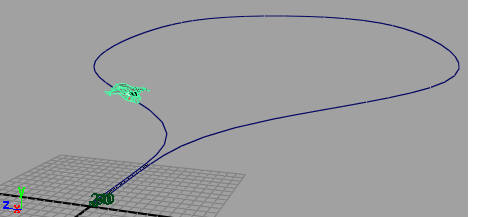
[4] Changing the timing of an object along a motion path
When you first assign an object to a motion path, by default, the object travels along the path at a constant speed. In this lesson, you want the aircraft to initially travel along the path slowly, accelerate, and then finally move more slowly when it nears the end of the motion path.
You can change the rate of travel for the aircraft by keyframing attributes that affect where the aircraft is positioned on the curve at a given time.
To view the attributes for the motion path
Go to frame 1 on the Time Slider.
Select the aircraft.
Open the Channel Box by clicking the Show/Hide Channel Box icon on the Status Line.

In the Channel Box, click on the word motionPath1 that appears in the Aircraft’s Inputs list.
The attributes for motionPath1 appear at the bottom of the Inputs list. (Scroll the Channel Box window if the motionPath1 attributes are not fully visible).
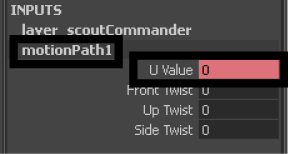
The U Value attribute controls where the aircraft gets positioned along the curve. The U Value refers to the curves parameterization. Parameterization is a method used by Maya to divide a curve into increments of known amounts so that a location along the curve can be determined.
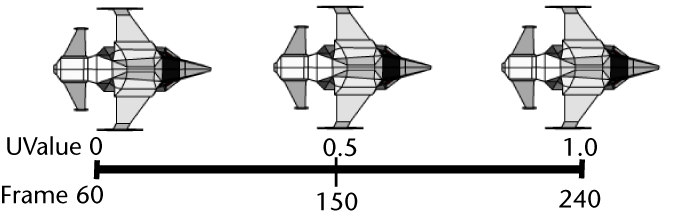
By default, the parameterization of a path curve is set between zero and one. At frame 60, the aircraft is at the beginning of the curve where the parameterization value is zero. When the aircraft is at the end of the curve (frame 240) the parameterization value for the curve is one. When the aircraft is halfway through the path animation (frame 150), it is located along the curve at a U Value of 0.5.
By setting the frame number and U Value and then setting a key, you change the timing for the aircraft’s motion along the path.
To change the timing for the aircraft along the path
Ensure the aircraft is selected so its attributes display in the Channel Box.
In the Time Slider, drag the current time indicator to frame 120 using the middle mouse button.
Middle-dragging the current time indicator, instead of using the left mouse button, changes the current time without repositioning the aircraft along the path.

In the Channel Box, set the U Value for motionPath1 to 0.1.
The aircraft is repositioned along the curve near the first bend. When you set the U Value to 0.1, the aircraft is positioned at a point that is a distance of 10 percent from the beginning of the curve (that is, the aircraft has completed 10 percent of the distance along the path).
Select the U Value channel, then right-click the name and select Key Selected from the drop-down list.
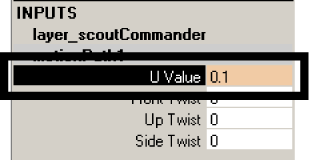
A position marker appears on the path curve indicating that a key frame has been set. The position marker is useful for determining where the aircraft is at a given time. Position markers do not appear when you render the animation. Using Key Selected ensures that a keyframe is set only for the item selected and nothing else.
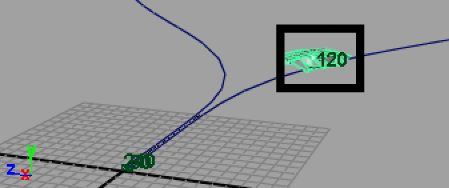
In the Time Slider, middle-drag the current time indicator to frame 180.
In the Channel Box, set the U Value for MotionPath1 to 0.9.
The aircraft is repositioned along the curve near the last bend. When you set the U Value to 0.9, the aircraft is positioned at a point that is a distance of 90 percent from the beginning of the curve. (that is, the aircraft has completed 90 percent of the distance along the path)
Select the U Value channel, then right-click and select Key Selected from the drop-down list.
A position marker appears on the path curve.
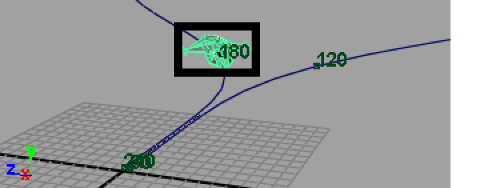
Click play on the playback controls to play back the animation.
The motion of the aircraft is not smooth as it travels along the path. It initially moves forwards and backwards a bit at the beginning and end of the path. This indicates that some adjustment of the animation is required. You adjust the animation using the Graph Editor.
To view the Graph Editor
From the main menu, select Window > Animation Editors > Graph Editor.
The Graph Editor appears.
In the Graph Editor, select View > Frame > Frame All.
The Graph Editor updates to display the animation curve for the motion path animation.
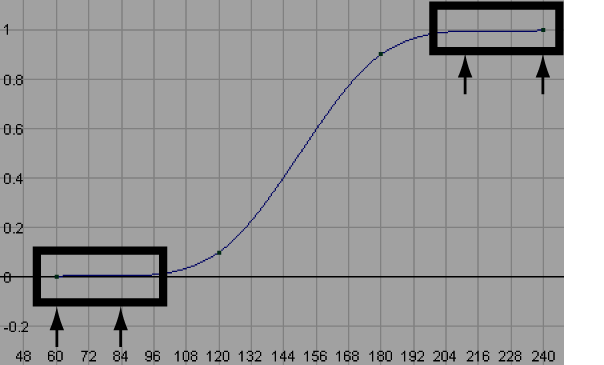
The shape of the animation curve provides some clues as to why the motion of the aircraft is not smooth. Between frames 60 and 84 the curve rises and then drops slightly. Because the animation curve represents translation along the curve, a drop in the curve indicates that the object travels backwards. A similar occurrence happens at the end of the curve as well. To correct this, you need to modify the tangents for the keys in the Graph Editor.
To edit the tangents for the keys in the Graph Editor
In the Graph Editor, press the shift key, then double click on the animation curve to select the four keys (frames 60, 120, 180 & 240)
In the Graph Editor menu, select Tangents > Linear.
The animation curve updates so that the keys connect via straight lines. This eliminates the dips in the curve that caused the aircraft to travel backwards.
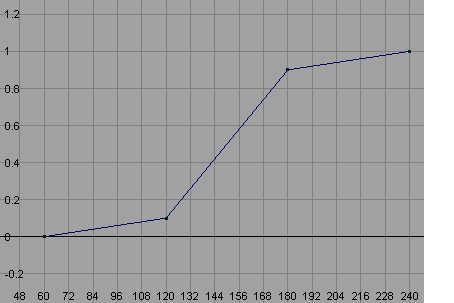
Next, you modify the tangents for keys 120 and 180 so the aircraft accelerates and decelerates near those points on the path curve.
In the Graph Editor, shift-select only the two keys for frames 120 and 180.
In the Graph Editor menu, select Tangents > Break Tangents.
Breaking the tangent for the keys allows you to modify the shape of the curve as it enters or leaves a key.
Select only the key for frame 120.
A pair of tangent handles appear on either side of the key. The handles let you edit the curvature of the animation curve near the key point.
Select the tangent handle to the right of the key.
The handle highlights in a yellow color.
From the Toolbox, select the Move tool.
Using the middle mouse button, drag the handle so the curve has a gentle curvature as it leaves the key as shown below.
Modifying the tangent in this manner changes how the motion transitions as the curve changes direction as it passes through the key. The aircraft will accelerate smoothly instead of immediately travelling at a different rate of speed.
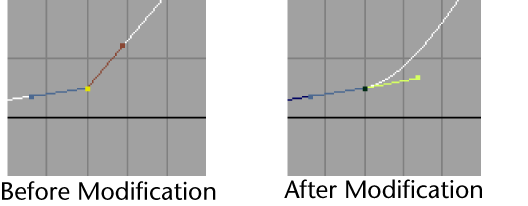
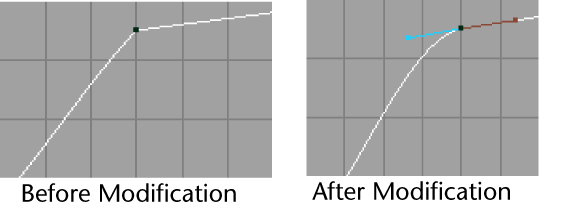
Select the key for frame 180.
Select the handle to the left of the key.
The handle highlights in blue.
Using the middle mouse button, drag the handle so the curve has a gentle curvature as it enters the key as shown below.
Modifying this tangent for this key will cause the aircraft to decelerate smoothly near the end of its travel.
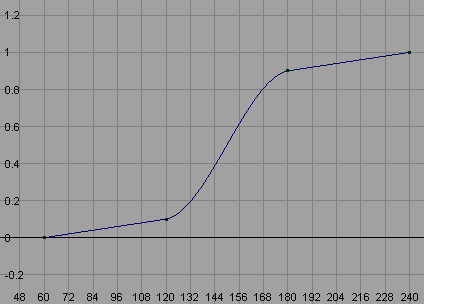
The modified animation curve appears as shown below.
Close the Graph Editor.
Click play on the Time Slider’s playback controls to play back the animation.
The backwards and forwards motion that previously occurred is corrected. The aircraft travels slowly towards the first bend in the path curve, then accelerates and travels at a constant speed around the curve until it nears the end of the path where it decelerates and then slowly moves towards the end of the curve.
[5] Rotating an object along a motion path
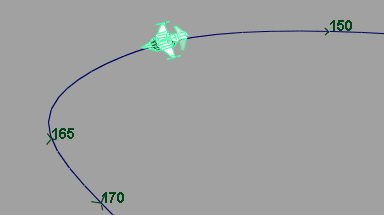
As the aircraft travels along the motion path, its orientation remains the same throughout the animation. A real aircraft rolls to one side (banks) as it flies in an arc. To make the aircraft roll to one side as it travels along the path you set keyframes for the Twist attributes in the Channel Box.
To animate the roll of the aircraft along the path
Ensure the aircraft is selected.
Set the Time Slider to frame 120.
The aircraft is repositioned along the curve near the first bend.
In the Inputs section of the Channel Box, click on motionPath1 to view its attributes.
Ensure the Front Twist value for motionPath1 is set to 0.
Select the Front Twist channel, then right-click and select Key Selected.
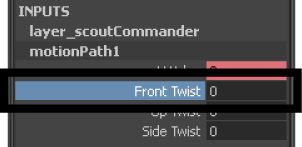
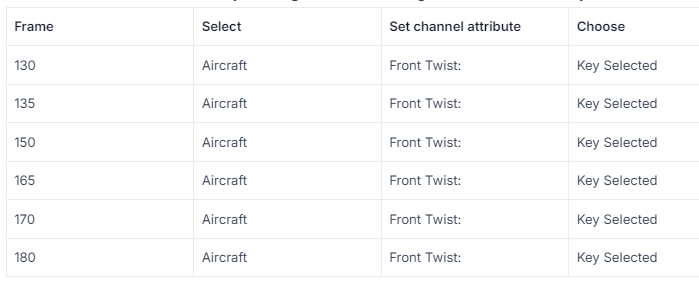
To set the remaining keyframes for the rotation of the aircraft, use the table below as a guide, keeping in mind that you set the keyframes in the following order:
Set the frame in the Time Slider
Set the values for Front Twist in the Channel Box.
Select the Front Twist channel by clicking its name, then right-click and select Key Selected.
Click play on the Time Slider playback controls to play back the animation.
The aircraft rolls to one side (banks) as it travels along the motion path.
[6] Blending keyframe and motion path animation
Blending between motion path and keyframe animation types is possible in Maya. Blending between the two animation types allows you to take advantage of the characteristics each animation type can provide without having to expend a lot of effort in determining where the change between the two types must occur.
In the steps that follow, you keyframe the aircraft to rise vertically from the floor surface and then travel along the motion path by blending between the two animation types. To accomplish this, you do the following:
Move the motion path up above the ground plane.
Keyframe the aircraft so it rises vertically above the ground plane.
Blend between the keyframe and motion path animations.
To move the motion path
In the scene view, select only the path curve.
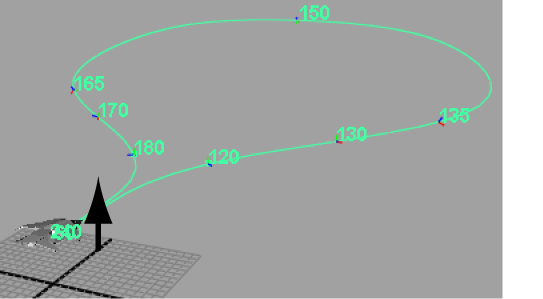
In the Channel Box, set Translate Y to 5 for PathCurve.
The path curve is repositioned above the ground plane in the scene view. The aircraft moves with the path curve because it is attached to the motion path.
To keyframe the motion for the aircraft
Select only the aircraft.
Set the Time Slider to frame 1.
In the Channel Box, set Translate Y to 0.
The aircraft is repositioned so it rests on the ground plane.
Select the Translate X, Y, and Z channels as well as the Rotate X, Y, and Z channels by click-dragging on their names so they become highlighted.
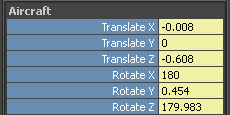
Right-click on any of the highlighted names, and choose Key Selected from the drop down list that appears.
Keys are set for the selected channels. Keyframing these channels establishes a blending connection that will be discussed in subsequent steps.
In the Channel Box, set Rotate Y to -90.
The aircraft is rotated 90 degrees from its motion path position.
Select the Rotate Y channel, then right-click and select Key Selected from the drop-down list.
A keyframe is set for the aircraft.
Additional channels appear in the Channel Box. When a keyframe is set for an object that already has motion path animation, the software automatically creates a connection to blend between the two animation types. These new channels are used to control the blend between the keyframe and motion path animation types. They control the blend for the Translation and Rotation attributes.
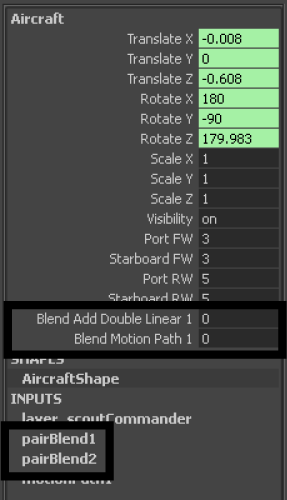
To set the remaining keyframes for the keyframe motion of the aircraft, use the table below as a guide, keeping in mind that you set the keyframes in the following order:
Set the frame in the Time Slider.
Set the Translate and Rotate values in the Channel Box.
Select only the channels for those values. Right-click on the selected name and choose Key Selected.
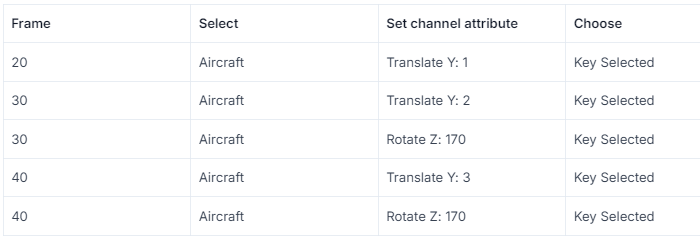
Click play on the Time Slider playback controls to play back the animation.
The aircraft rises above the ground plane and then stops at frame 40.
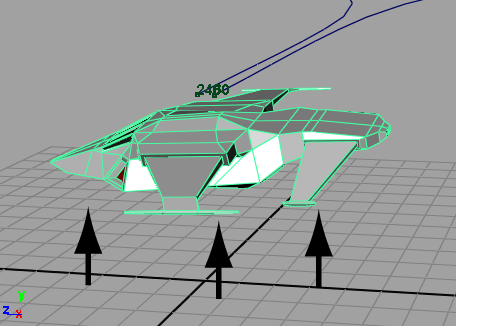
The animation stops because the motion path animation was shut off when the blend attribute was automatically created when you set the first keyframe. The blend attribute values are set to zero by default. When the blend values are set to zero, the keyframe animation has full influence on the object, and the path animation is shut off. When the blend values are set to one, the motion path has full influence on the object and the keyframing is shut off. When the blend values are between zero and one, the aircraft’s motion is blended between the keyframe and motion path animation.
In the next steps, you keyframe the blending attributes so the blending begins at frame 30 and ends at frame 70. This blends the two animation types together over a period of 40 frames.
To blend between the two animation types
Set the Time Slider to frame 30.
In the Channel Box, ensure the blend values are set as follows:
Blend Add Double Linear: 0
Blend Motion Path: 0
Select both the Blend Add Double Linear1 and Blend Motion Path1 channels, then right-click on either name and select Key Selected from the drop down list.
A key is set for the blend starting point for the aircraft. At frame 30 the two animation types will begin to blend together.
Set the Time Slider to frame 70.
In the Channel Box, set the following:
Blend Add Double Linear1: 1
Blend Motion Path1: 1
Select both the Blend Add Double Linear1 and Blend Motion Path1 channels, then right-click on either name, and select Key Selected from the drop down list.
A key is set for the blend ending point for the aircraft. At frame 70 the motion path animation will have full influence.
Click play on the Time Slider playback controls to play back the animation.
The two animation types are combined but the motion does not appear correct. The aircraft rotation flips upward momentarily when it begins to travel along the motion path.
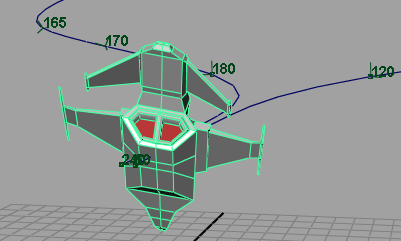
The interpolation type for the rotations during the blending is not set correctly.
Setting the pairBlend Rot Interpolation setting to Quaternions changes how the rotations are interpolated during the blend. In this example, Quaternions provides a better interpolation type when blending between the keyframe and motion path animation.
To edit the rotation interpolation type for blending
In the Channel Box, click on the pairBlend1 channel.
Scroll the Channel Box so you can view the Attributes for pairBlend1.
Set the Rot Interpolation setting to Quaternions by clicking on the Euler angles name with the left mouse button.
Click on the pairBlend2 channel.
Click on the Euler angles name in the Rot Interpolation attribute and choose Quaternions.
Click play on the Time Slider playback controls to play back the animation.
The animation plays back smoothly. Observe how the blending also takes into account the rotation of the aircraft so it meets up with the motion path smoothly.
[7] Using Playblast to playback an animation
Playblast allows you to preview an animation by calculating the separate frames and playing them back in a multimedia player window based on the Playblast options. Playblast provides a more accurately timed playback than using the Time Slider.
To playback the animation using Playblast
Select the path curve, and then select Display > Hide > Hide Selection to hide the curve while you Playblast.
Select Window > Playblast.
Playblast calculates the frames for the animation and then plays them back in the player window.
You have completed this lesson.
[8] Beyond the lesson
In this lesson you learned how to:
Create a motion path animation using a NURBS curve as the motion path.
When you draw your own curves remember that a curve has a defined start and an end point based on how you create it. If your object is initially positioned at the wrong end of the curve, you can reverse the direction of the curve by setting the Menu Set to Modeling and then selecting Edit Curves > Reverse Curve Direction.
If your objects are not oriented correctly on the path initially, you can change the options in the Attach to Motion Path Options window (Animate > Motion Paths > Attach to Motion Path).
Adjust the timing and rotation of an object when it travels along the motion path.
In this lesson you were shown how to keyframe the roll (bank) of the aircraft. The Attach to Motion Path Options window provides an option called Bank. The Bank option rotates an object as it travels around curved portions of a motion path. It is useful for simple motion path animation.
Blend between keyframe and motion path animation types on the same object.
(For more information, search for pairBlend in the Maya Help.)