Character Setup 2: Smooth skinning
Mohamad's interest is in Programming (Mobile, Web, Database and Machine Learning). He is studying at the Center For Artificial Intelligence Technology (CAIT), Universiti Kebangsaan Malaysia (UKM).
[1] Introduction
After you create a skeleton, you bind it with the character’s surface so that the surfaces move with the skeleton during animation. Binding is also called skinning, and a character’s surface after binding is called a skin.
It is important that the character’s skin deforms naturally as the skeleton moves. Near joints, the skin bulges or indents when you rotate the joints.
In Maya, the skin deforms because the surface’s vertices (or CVs) move in response to the rotation of adjacent joints. The vertices are known as skin points. This is useful for animating elbows, shoulders, necks, and so on.
By default, the influence a joint has on a skin point’s movement depends on how close it is to that joint. You can edit skin point weighting to change the default movement.
In this lesson you learn how to:
Bind a skeleton using a smooth bind technique.
View and modify skin weights using the Paint Skin Weights Tool.
Use influence objects to enhance the skin deformation of a character.
[2] Open the scene for the lesson
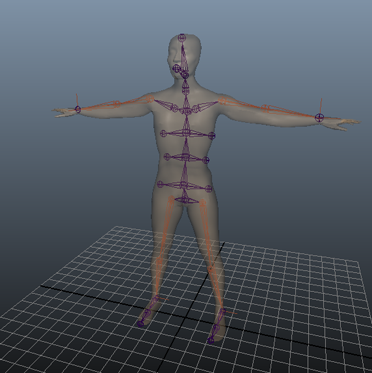
In this lesson, you will load a scene containing a human character and skeleton. Each leg and arm of the skeleton has an IK handle that lets you pose the limbs conveniently. If you completed the prior lesson, the character, skeleton, and IK handles will be familiar.
Make sure you’ve done the steps in Preparing for the lessons.
Open the scene file named SmoothSkin.mb.
This file can be found in the GettingStarted2015LessonData\CharSetup directory that you set as your Maya project.
The character in the scene, Jackie, is displayed in a transparent fashion so you can see the skeleton beneath the surface.
Select Window > Settings/Preferences > Preferences. In the Preferences window, click the Kinematics Category. Enter 0.4 for the Joint Size, then click Save.
This displays smaller joints. At the default size of 1.0, the large joints obstruct your view of the skin.
[3] Smooth binding a skeleton
You use Jackie as the surface to be bound to the skeleton.
To bind the skeleton using smooth skinning
Select Jackie.
Shift-select the back_root joint.
The back_root joint is at the base of Jackie’s spine. If you are not sure which joint it is, select it in the Hypergraph (Window > Hypergraph: Hierarchy).
Select Skin > Smooth Bind >☐.
In the Smooth Bind Options window, set Max Influences to 3, then click Bind Skin.
A Max Influences value of 3 specifies that three joints influence each skin point. By default, the joint closest to the point has the most influence. The second most influential joint is that joint’s parent or child joint, whichever is closest to the point. The third most influential joint is the nearest parent or child of the second joint. The influence drops with the distance from the joints. The amount of influence each joint has on any skin point is the skin weight.
The default skin weights create smooth deformations of the skin at elbows, knees, and elsewhere as the nearby joints rotate.
Select and move any or all of the four IK handles to pose the arms and legs in various positions in order to get used to posing with the IK handles.
To select an IK handle, drag a selection box around a wrist or ankle joint. To move a handle, use the Move tool to drag the handle in the desired direction.
NOTE:
You can also select the IK handles in the Hypergraph. The handles are indented under jackieSkeleton. Each is named for a leg or arm, for example, ikHandleLeftLeg. For more details on IK handles, see Skeletons and kinematics.
If you prefer to turn off the skin’s transparency so you can see the skin more clearly, turn off Shading > X-Ray.
Do not be concerned that the skeleton pokes through the skin, as the skeleton is not displayed in a rendered image.
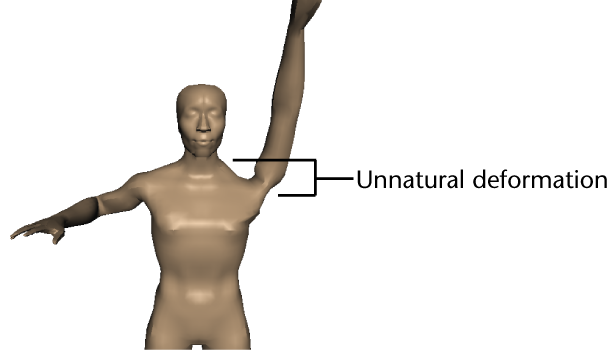
As you pose the arms and legs, examine the skin in the regions where joints bend. For many poses, the skin looks natural. For others, the skin folds, compresses, or bulges unnaturally. The pelvis, shoulders, and torso are common problem areas for various poses. For example, if you move an arm straight up, the shoulder compresses as in the following figure.
There are two ways to improve the smooth skin deformations:
Add an influence object to eliminate collapsing regions or to create muscle bulge. For example, you can use an influence object to make the shoulder region look more natural in the prior pose.
Edit skin weights—to remove minor lumps or indented regions. For example, you can fill out an undesirable concave region at the chest that appears when you move the arm to certain poses.
The following procedures explain the techniques.
[4] Skin weighting and deformations
In the next steps, you’ll learn how joints and skin weights influence deformations at Jackie’s chest. In a subsequent section, you’ll improve uneven deformations.
To see how skin weights affect a skin’s deformation
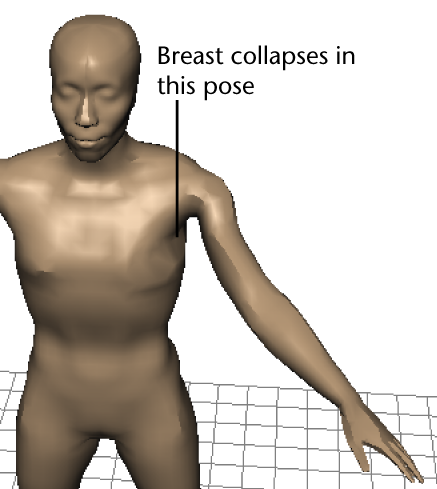
Pose the left arm similar to the following figure. The left breast becomes irregularly shaped.
Select Jackie.
Select Skin > Paint Skin Weights Tool >☐.
In the Influences list of the Tool Settings window, select any joint, for instance, pelvis.
The grayscale color of Jackie’s skin indicates how much influence the selected joint has on the skin deformation. In general, a white region of skin is influenced nearly entirely by the selected joint. A gray region is influenced significantly by one or two additional joints, and a black region indicates skin not influenced by the selected joint at all.
TIP:
If you prefer, you can turn on Use Color Ramp in the Gradient section of the Paint Skin Weights Tool to view the influence feedback in color. This can make it easier to see small weights.
Each point on Jackie’s surface is influenced by three joints, as specified by the Max Influence setting in a prior step. However, one or two of the three joints might have so little influence as to be insignificant.
In this case, the left breast becoming irregularly shaped as you pose the arm indicates that one or more of the joints is exerting too much or too little influence on the surface. In the next steps, you will determine which joints are influencing the irregular region.
Do the following to select the vertices in the problem area:
In the Paint Skin Weights Tool, turn on Paint Select mode (below the Influences list).
Right-click Jackie’s skin and select Vertex from the marking menu.
Paint to select the vertices around Jackie’s shoulder.
In the Paint Skin Weights Tool, click the Show Influences

button.
All joints that influence the selected vertices are selected in the Influences list.
TIP:
If you don’t immediately see the selected influences in the list, scroll to find which influences are selected.
Depending on which vertices you selected, the Influences list shows you that the main joints influencing this region are from the mid and upper back, and the left arm.
Now that you have narrowed down which joints are influencing the shoulder, select each entry in the Influences list individually to view the shades of gray on Jackie’s skin.
The left_arm_root is the main influence. The upper_back, mid_back, and left_top_rib also have influence, though not exactly in the same region.
[5] Modifying skin weights
You can modify the skin weights for any of the influencing joints to alter the irregular region. If you don’t get the desired results when you change the skin weights of one of the influencing joints, you can undo your changes and try another influencing joint.
In general, it’s best to modify the skin weights of the most influential joint first, then work with less influential joints if you don’t get the desired results. Modifying skin weights requires experimentation.
In the next steps, you’ll modify the skin weights for the left_arm_root joint.
To modify skin weights using the Paint Skin Weights Tool
Select left_arm_root in the Influences list.
Set the Mode to Paint, then set the Paint Operation to Add.
Set the Value to 0.1.
Drag to paint on the irregular region of the breast.
As you stroke a region, a red circle icon indicates the area affected by the brush stroke. Each stroke adds 0.1 (10%) to the skin weight. The weight for a skin point has a maximum value of 1 (fully white).
TIP:
To change the size of the red circle icon, change the Radius(U) value in the Paint Skin Weights Tool.
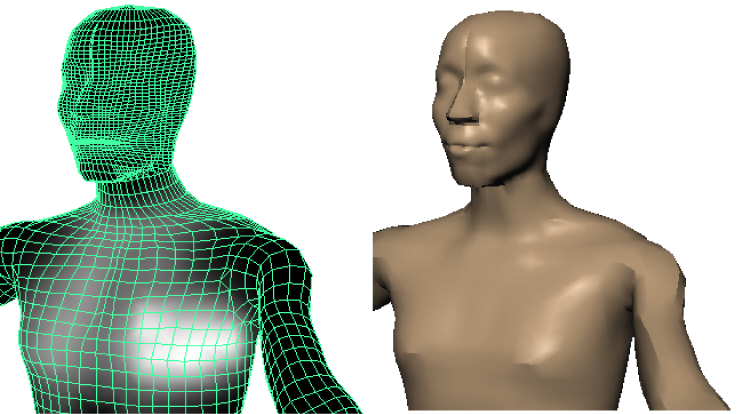
Repeat the strokes several times until the irregular region becomes smoother. The jagged, asymmetrical wireframe at the breast becomes more symmetrical as the skin becomes smoother. The region whitens, which indicates increased influence from the left_arm_root joint. Note that increasing the influence of one joint lessens the influence of the other influencing joints.
To check the shape with full-color shading, click the Select Tool

in the Maya Toolbox. (You might also prefer to cancel the selection of Jackie to eliminate the display of the highlighted wireframe.)
To continue modifying the skin weights, select Jackie and select Skin > Paint Skin Weights Tool, or click

in the Maya Toolbox.
There are several additional tool settings you might find useful as you modify skin weights:
The Smooth paint operation smooths the weights of points by averaging the stroked points with the weights of the surrounding region. This is useful if you add to the weight values in some region but the points become unevenly weighted. Uneven weights are indicated by mottled gray skin.
The Weight Hammer button

lets you select vertices in a region with undesirable deformation then click to quickly flatten the area. This tool checks the weight values of neighboring vertices and applies the same weight value to the selected vertices.
You can use the Scale operation with a Value less than 1 to scale down the point weights of a stroked region.
You can select any of the Profile icons to specify the region affected by strokes. The two leftmost icons are the most commonly used shapes.
After you eliminate the irregular region from the left breast, move the arm to different positions to see if the breast’s shape stays natural in various poses.
It is common for a surface to look good in one pose but not in another. Strive to make the surface look good in the poses that you are likely to use during animation.
If you want more practice, pose the right arm as you posed the left arm and fix the corresponding irregular region in the right breast. This time, fix the region by modifying the weights for the upper_back joint rather than the right_arm_root. As mentioned previously, you can modify point weights of alternative joints to get a similar effect.
[6] Influence objects
You can create an object and use it to influence the shape of smooth skin. The object, called an influence object, acts like a surgical implant against which the skin deforms. For example, you can create a sphere and use it to simulate a muscle or bone that bulges as you pose the character in certain positions. You can also use an influence object to smooth deformation and maintain volume in regions that collapse while bending.
In the next steps, you’ll use a sphere as an influence object to simulate an elbow jutting out as Jackie’s arm bends. To use an influence object, the skeleton must be in the bind pose—the original pose at which the skin was bound to Jackie.
To return the skeleton to the bind pose
Click the Select Tool and cancel the selection of Jackie.
Turn off Modify > Evaluate Nodes > IK Solvers.
After you use an IK handle to pose a character, you must do this step before you can return the skeleton to the bind (T-stance) pose.
Select back_root, the root of the skeleton.
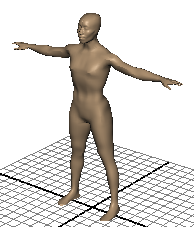
Select Skin > Go To Bind Pose.
Select the ikHandleLeftArm in the Hypergraph. Use the Move Tool to move the handle manipulator slightly in any direction. When you release the mouse, note that the arm does not move and that the IK handle manipulator snaps back to the desired position at the end of the joint chain. Repeat this step for any other IK handles you posed previously.
Turn on Modify > Evaluate Nodes > IK Solvers.
You must do this step to enable the IK solvers so you can manipulate IK handles in the scene again.
To position a sphere to be used as an influence object
Shift-click Jackie’s surface (anywhere but on the skeleton) and select Actions > Template from the marking menu.
By making Jackie a template, you won’t accidentally select Jackie in subsequent steps.
Create a sphere (select Create > Polygon Primitives > Sphere) and name it elbow_influence.
Scale the sphere to be slightly smaller than any of Jackie’s joints (see illustration below).
Move the sphere so that its surface is positioned where the elbow would jut out, but still within the skin. You can optionally reshape the sphere’s curvature to resemble the tip of an elbow jutting out from a bent arm. For example, you can scale the sphere in one dimension to squash its shape or you can move individual vertices. A top view of the sphere’s shape and position follows:
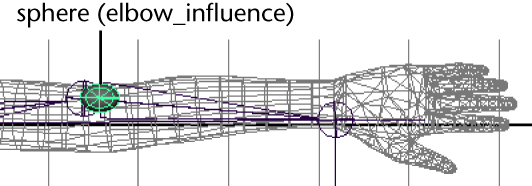
The exact position and scale of the sphere is unimportant. You can make slight position and scale adjustments later to enhance the deformations that result from its use.
To make the sphere an influence object
In the Hypergraph, select Jackie and Shift-select elbow_influence.
Select Skin > Add Influence >□. In the Add Influence Options, select Edit > Reset Settings, and then click the Add button.
Maya completes the operation within a few moments. To ensure the influence object stays in the correct position at the elbow, you will parent it to the left_shoulder joint.
In the Hypergraph, Shift-select elbow_influence, elbow_influenceBase, and left_shoulder joint, in that order.
The order of selection is important. The parent object should be selected last.
Press p to parent the elbow nodes under the left_shoulder joint.
The elbow_influence nodes appear in the skeleton hierarchy below the left_shoulder joint.
The elbow_influenceBase is known as a base object. It stores vertex position information for the influence object. The reason for parenting the base object to the left_shoulder joint is so that the influence object’s vertices stay in the correct position at the elbow whenever the elbow moves to a new position. Other than this step, you do not work with the base object.
Right-click Jackie and select Actions > Untemplate. It is easier to see subsequent skin deformations when Jackie is displayed with smooth shading rather than as a template.
From the menus at the top of the top view, turn off Show > Joints to avoid having the joints obstruct your view of the skin.
Use each arm’s IK handle (ikHandleLeftArm and ikHandleRightArm) to pose the arms in the following position.
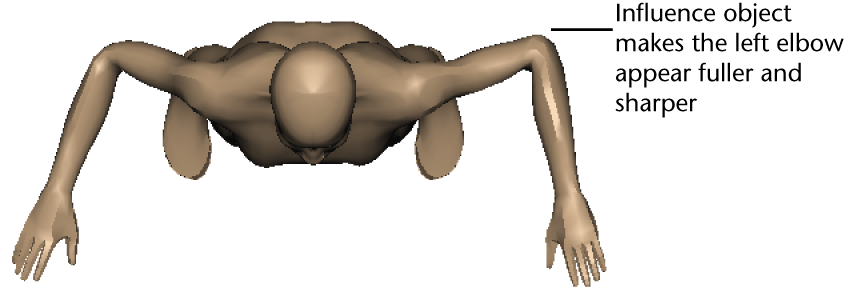
The left elbow looks more natural than the right elbow. To tune the elbow’s deformation during bending, change the position, scale, and rotation of elbow_influence.
Do not be concerned if the influence object pokes through the skin. It won’t be displayed when you render the animation.
[7] Beyond the lesson
In this lesson you learned how to:
Bind a skeleton to a single surface.
You can bind a skeleton to multiple surfaces or even to a selection of polygonal vertices or NURBS CVs or subdivision surfaces.
Use the Paint Skin Weights Tool to prevent a region from collapsing upon deformation.
To control skin weights with more precision than shown in the lesson, you can modify skin weights numerically with the Component Editor. If you smooth skin multiple surfaces which have been seamed together, there are many tool settings for the Paint Skin Weights Tool that make the task easier.
Use an influence object to make an elbow stick out upon bending.
Another common use of an influence object is to simulate a muscle bulging during joint rotation. The technique requires use of Set Driven Key to link the bulging influence object’s scale values to the rotation of the appropriate joint. A brief example of this technique is provided in the Maya Help for Smooth Skin.
Skin weights and influence objects cannot overcome all modeling problems. For instance, if you further separate Jackie’s legs sideways, you will see an undesirable fold at the hips. This occurs because of the asymmetrical arrangement of polygonal edges in the hip region of the original model. To fix the problem, you would need to detach the skin, alter the original model, then smooth bind the model again.
Maya has an alternative skinning method, rigid skinning, which gives results similar to smooth skinning but requires use of different enhancement tools: flexor and lattice deformers. In general, smooth skinning gives more natural deformations with less effort than rigid skinning. If you skin multiple seamed surfaces, however, processing is faster with rigid skinning than with smooth skinning.
Smooth skinning is just one of the techniques for perfecting a character’s deformations during animation. You can use Maya’s other deformers alone or in addition to smooth skinning to achieve the results you want.