Animation 2: Set Driven Key
[1] Introduction
With keyframe animation, you key an attribute value to a time in the Time Slider. You repeat this process with different values at different times to animate the object.
When you must animate multiple objects or attributes that interrelate, setting keyframes can quickly become a complex task. Set Driven Key is a technique for driving one object’s or attribute’s animation from another attribute.
With driven keys, you relate an attribute value to the value of another attribute. You repeat this with different values to create a dependent link between a pair of attributes. A change in the driver attribute alters the value of the driven attribute. In this way the animation of the driven attribute doesn’t need to be manually set; it occurs automatically once the relationship between attributes has been established. This makes setting up some types of animations much more efficient. For example, you can use driven keys to make a door open when a character walks in front of it.
In this lesson, you will learn how to use Set Driven Key in order to animate a door rising upwards when a ball approaches it.
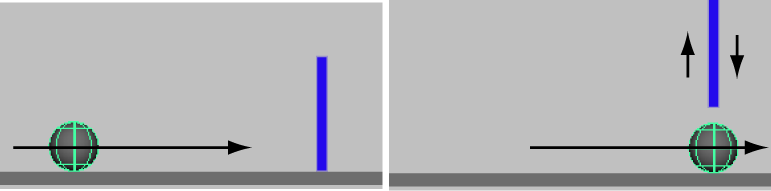
In this lesson you learn how to:
Link the object attribute behavior between two objects which will link the movement of one keyframed object to another with no keyframes assigned.
Use the Graph Editor to adjust the animation for the driven object.
[2] Lesson setup
In the following steps, you set a playback range that’s long enough to see the animation clearly. You also create the ball and the door, and position them in the scene view in preparation for the animation.
Make sure you’ve done the steps in Preparing for the lessons.
Create a new scene.
Go to the start frame.
Create a polygonal cube and name it Door.
With the pointer in the perspective view, press 5 (for Shading > Smooth Shade All).
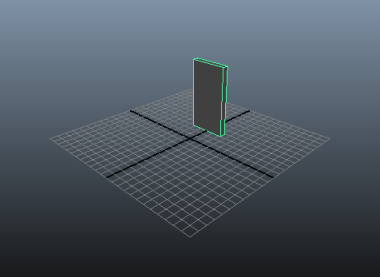
Scale and position it roughly as shown. Have the bottom edge of the door lie roughly along the X-axis.
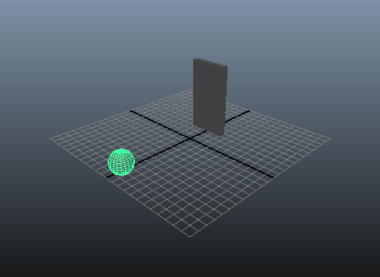
Create a small polygonal sphere and name it Ball. Scale and position it roughly as shown in the prior figure in the introduction. Have it sit roughly at 0, 1, 10 (X, Y, Z).
[3] Using Set Driven Key to link attributes
The following steps link the door’s movement to the ball’s movement using Set Driven Key.
To link the door’s movement to the ball’s movement
Select the door, then select Animate > Set Driven Key > Set.
The Set Driven Key window appears with the door in the Driven list.
Click Translate Y in the Driven list.
This is the attribute to be driven by the ball’s movement.
Select the ball in the scene view.
In the Set Driven Key window, click Load Driver.
The ball appears in the Driver list.
In the Set Driven Key window, click Translate Z in the Driver list.
This is the attribute that will drive the door’s movement.
You can set a driven key only after you select an attribute in the Driver list and in the Driven list.
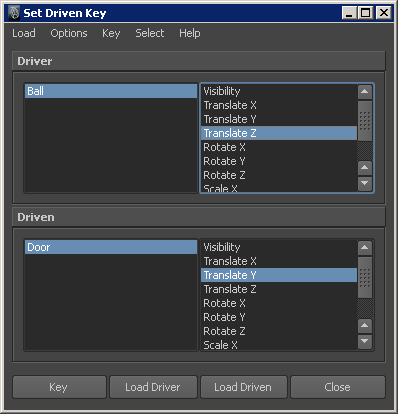
In the Set Driven Key window, click Key.
This sets a driven key relationship that links the current Translate Z value of the ball to the current Translate Y value of the door. Whenever the ball’s Translate Z is at this position, the door’s Translate Y will be at its current position.
The Time Slider is not involved in a driven key relationship and displays no red markers for keys.
Move the ball to the door’s position and then move the door above the ball.
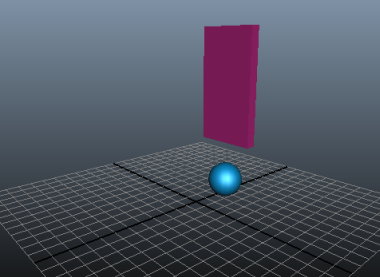
NOTE:
The objects in these images have materials applied to give them color. To learn how to apply materials refer Shading surfaces in the Rendering lessons.
In the Set Driven Key window, click Key.
This sets another driven key that links the current Translate Z value of the ball to the Translate Y value of the door.
Move the ball to the right of the door and then lower the door to its previous position as shown in the following figure.
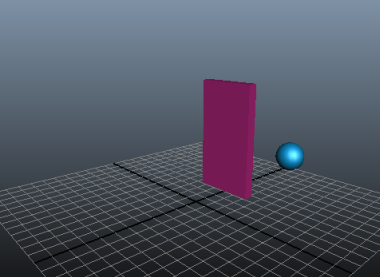
In the Set Driven Key window, click Key.
This sets another driven key that links the attributes.
You’ve set three driven keys that link the attribute values at different positions. Maya interpolates the linked values to generate the values between the keys.
If you drag the ball toward the door from either side, the door rises smoothly.
Playing back the animation from the Time Slider doesn’t move the ball or the door. Driven keys link one attribute to another. They don’t link attributes to times in the Time Slider. However, if you were to animate the movement of the ball, the door would move based on the driven key relationship that has been set.
[4] Viewing the results in the Graph Editor
In the next steps you’ll examine the animation curve resulting from the driven keys you’ve set. If you are unfamiliar with animation curves and the Graph Editor, see Keyframes and the Graph Editor.
To view the set driven key results in the Graph Editor
Select the door.
To display the animation curve for a driven key in the Graph Editor, you must select the object containing the driven attribute, not the object containing the driving attribute.
Select Window > Animation Editors > Graph Editor.
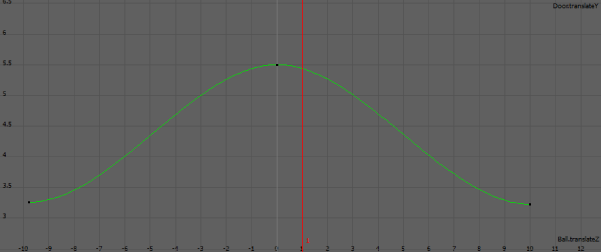
From the Graph Editor, select View > Frame > Frame All. The Graph Editor shows the driven keys that link the door’s Translate Y value to the ball’s Translate Z value. An example follows:
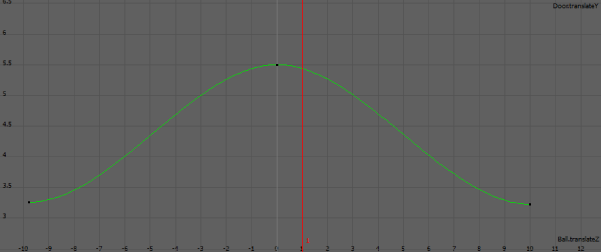
The column of numbers on the left lists the driven attribute values. The row at the bottom lists driver attribute values. The animation curve shows the relationship between the values—the door’s Translate Y value rises as the ball’s Translate Z value approaches 0.
You can use the Graph Editor to edit the shape of the curve to make the door rise faster, slower, and higher as the ball approaches it.
[5] Beyond the lesson
In this lesson you learned how to:
Set driven keys to link one attribute’s values to another.
A driven attribute is not directly affected when you play the animation. It is linked to a driving attribute’s value, not animation time. However, you can use regular animation keys, expressions, motion paths, or other techniques to animate the driving attributes. This indirectly animates the driven attribute.
You may find the following notes helpful when using Set Driven Key:
- You can set driven keys to control a driven attribute with multiple driving attributes. For instance, you can have a muscle bulge when an elbow rotates, and have the bulge increase when the wrist rotates.
About the author
Mohamad's interest is in Programming (Mobile, Web, Database and Machine Learning). He is studying at the Center For Artificial Intelligence Technology (CAIT), Universiti Kebangsaan Malaysia (UKM).
Comments
Join the discussionNo comments yet. Be the first to comment.