Animation 1: Keyframes and the Graph Editor
Mohamad's interest is in Programming (Mobile, Web, Database and Machine Learning). He is studying at the Center For Artificial Intelligence Technology (CAIT), Universiti Kebangsaan Malaysia (UKM).
[1] Introduction
When you set a keyframe (or key), you assign a value to an object’s attribute (for example, translate, rotate, scale, color) at a specific time.
Most animation systems use the frame as the basic unit of measurement because each frame is played back in rapid succession to provide the illusion of motion.
The frame rate (frames per second) that is used to play back an animation is based on the medium that the animation will be played back (for example, film, TV, video game, and so on.)
When you set several keys at different times with different values, Maya generates the attribute values between those times as the scene plays back each frame. The result is the movement or change over time of those objects and attributes.
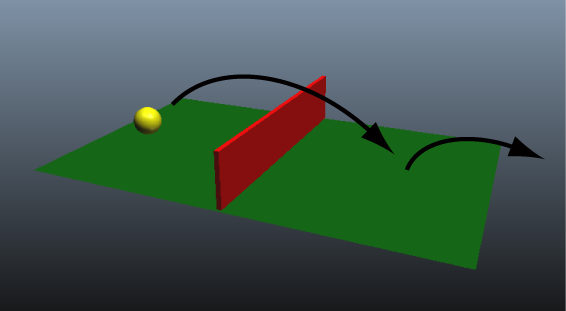
In this lesson, you will use simple keyframing techniques to make a ball fly over a fence and bounce off the ground.
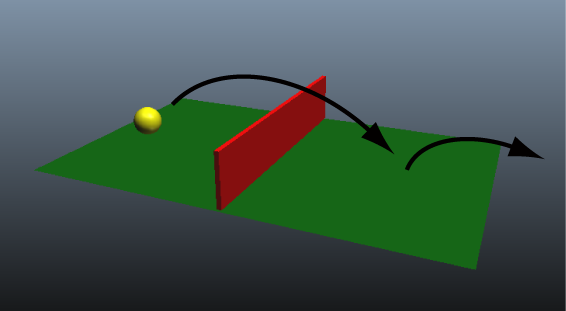
In this lesson, you learn how to:
Set keyframes for animatable objects and their attributes.
Use the Time and Range slider and Playback Controls to control the playback.
Use keyboard shortcuts to set keyframes.
Use the Graph Editor to view animation curves.
Modify the animation of objects using the Graph Editor.
Set preferences to increase the playback quality.
[2] Setting the playback range
In the following steps, you open the scene and set how long the animation will play.
To open the scene
Make sure to do the steps in Preparing for the lessons.
Open the scene file named Keyframing.mb.
This file can be found in the GettingStarted2015LessonData\Anim directory that you set as your Maya project.
The scene contains a ball object that is currently positioned on the X-axis near the edge of a ground plane.
To animate the ball, you key its position at different times of the playback range.
The playback range is defined by the Time and Range slider. The Time and Range slider controls allow you to playback or scroll through your animation or move to a specific point in time of your animation so you can set keyframes.
To set the playback range for the scene
Look over the playback controls, as shown in the figure below:
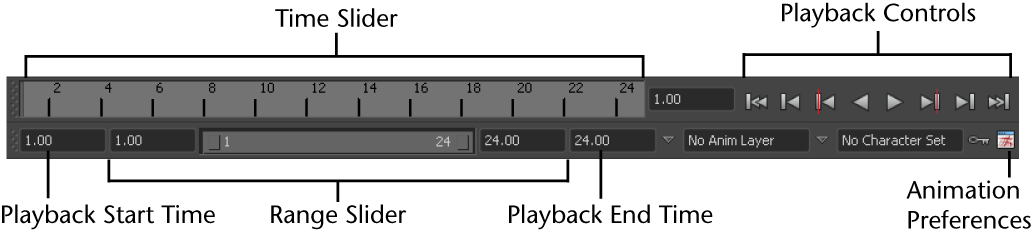
The Time Slider displays the playback range and keys you’ve set for a selected object. Keys are displayed as red lines. The box at the right of the Time Slider lets you set the current frame (time) of the animation.
The Playback Controls control animation playback. You may recognize the conventional buttons for play and rewind (return to the start time). The stop button appears only when the animation is playing. To find out which operation a button represents, hold the mouse pointer over it.
The Animation Preferences button displays a window for setting animation preference settings such as the playback speed.
The Range Slider controls the range of frames that play when you click the play button.
The above items will have more relevance as you work through this lesson. After you complete this lesson, experiment with these items to learn more what they do.
The playback range is currently set at a range of 1 to 24. At a default playback rate of 24 frames per second, the scene can play for one second. Because you’ll animate the ball for a few more seconds than this, you need to lengthen the playback range.
In both the Playback End Time box and the Animation End Time box, enter 72.
A frame rate of 24 frames per second (fps) is the frame rate used for motion picture film. For video, the frame rate can be 30 fps (NTSC) or 25 fps (PAL) depending on the format being used.
With a playback range of 1 to 72, you’ll be able to create three seconds of animation. (72 frames divided by 24 frames per second = 3 seconds.) This is enough time for the short animation you’ll create in this lesson.
[3] Setting keyframes
In the following steps, you use keyframes to set the starting and ending positions of the ball’s movement.
To set beginning and ending keyframes
Click the Go To Start button to go to the start of the playback range. This changes the current frame to 1.
Select the ball, then select Animate > Set Key. (Keyboard shortcut: s).
This sets a key at frame 1 for all transform attributes of the ball. Transform attributes are the X, Y, Z move attributes. Although you animate only the translate X and Y attributes of the ball in this lesson, keying all transform attributes saves you time having to choose specific attributes to be keyed.
In the Time Slider, notice the red marker at frame 1, known as a tick. This tick appeared when you set the key for frame 1. With the ball selected, ticks in the Time Slider indicate where you’ve set keys.
Go to frame 72. A convenient way to do this is to click the desired position in the Time Slider.
With the Move Tool, drag the ball’s X-axis handle to position the ball at the right edge of the ground as shown in the image below.
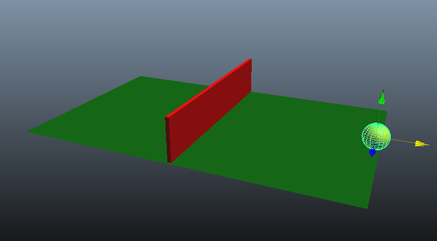
Set a key at frame 72. (Press s.)
Go to the start time and play the animation.
From the two keys you’ve set, Maya creates motion between the positions. By default, the animation plays in a loop from frame 1 to 72. The ball travels through the fence at this stage.
Press the Stop button on the playback control to stop the animation after you view a few repetitions.
You can drag the mouse back and forth (scrub) in the Time Slider to see the animation play back and forth at the speed you drag the mouse.
If you were to display the scene with Panels > Layouts > Four Panes, only the active panel would show the ball moving.
To make the ball fly over the fence rather than pass through it, you need to position the ball above the fence and set a key there.
To set intermediate keyframes
Go to frame 33 or so—at the moment where the ball sits in the middle of the fence.
With the Move tool, drag the Y-axis handle of the ball until it sits slightly above the fence.
TIP:
Throughout this lesson, tumble the perspective view or examine a front view to make sure the positioning is correct.
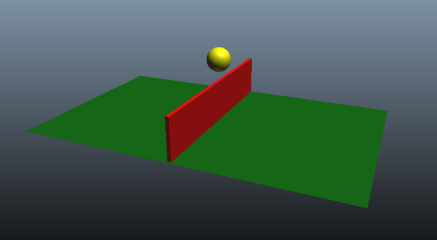
Set a key. (Press s.)
Play the animation.
The ball now flies off the ground, over the fence, and back to the ground in a smooth arc between the keyed start, middle, and end positions.
Press the stop button to end the playback.
In subsequent steps, play the animation after each key you set. It’s generally useful to check your work in progress after each key, especially when you are learning.
In the next steps, you’ll set keys to bounce the ball in the middle of the right half of the ground.
To set keyframes to make the ball bounce
Go to frame 50. At this moment, the ball sits in a position above the middle section of the right half of the ground.
Move the ball so it sits on the ground.
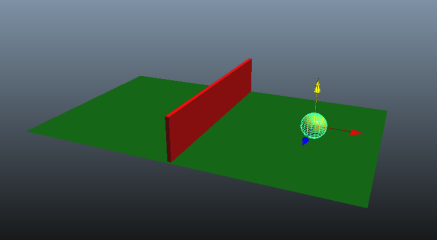
Set a key.
Go to frame 60.
Move the ball up again, but not as high as its peak height above the fence.
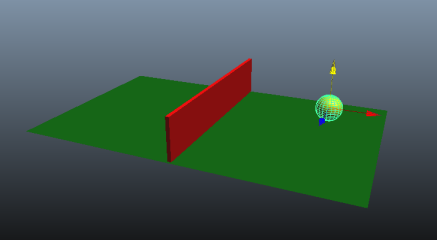
Set a key. When you play the animation, the ball travels over the fence and bounces on the other side.
If you have a fast computer, you might notice that the animation plays too fast. By default, Maya plays the animation as fast as it can be processed. Because this scene is simple, the animation might play faster than the default film rate (24 frames per second).
Do not be concerned that the animation plays with a halting or jerky motion. When you render all the frames of your animation for final production, the animation will be smooth. If you want to preview the animation at the smooth production speed (or nearly so), use Window > Playblast.
[4] Using the Graph Editor
For a more convincing animation, you need to bounce the ball more sharply off the ground and speed up the ball’s horizontal movement. You’ll use the Graph Editor to make both modifications.
The Graph Editor is an editor that graphically represents the various animated attributes in your scene. The animated attributes are represented by curves called animation curves. You edit animation curves in the Graph Editor.
To edit animation curves using the Graph Editor
With the ball selected, select Window > Animation Editors > Graph Editor.
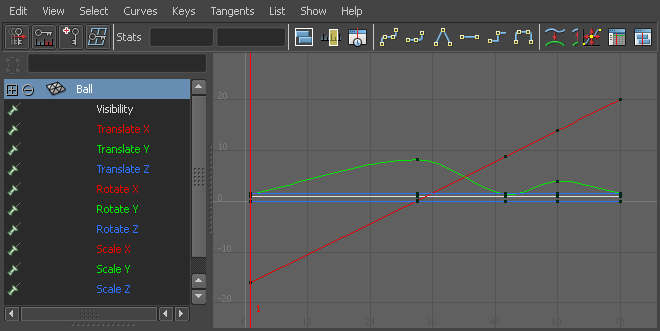
The Graph Editor displays several animation curves, one for each keyed attribute of the ball. The animatable attributes for the ball are listed in the left column. Specifically, it displays the attributes of the selected transform node of the ball.
Each curve graphs how an attribute changes value during the animation. The column of numbers at the left represents attribute values that can be animated, while the row of numbers at the bottom represents time (frame) values. At each point on the curve, you can see the value of an attribute at a particular time. The small black squares on the curves represent points where you’ve set keys.
Shift-Select only the Translate X and Translate Y attributes in the left column of the Graph Editor.
Now only the animation curves for Translate X and Translate Y appear in the Graph Editor.
This simplifies the display. With too many curves present, it’s hard to see specific curves. When you use the Graph Editor, you usually focus on one or a few curves.
TIP:
To change the background or other colors in the Graph Editor, select Window > Settings Preferences > Color Settings, then expand the Animation Editors heading on the General tab. These settings let you change the Grid Axes, Grid Lines, and Background.
To center the display of the animation curves, select View > Frame > Frame Selection (in the Graph Editor window). If you want to see more detail in the graph, use your mouse to dolly and track the graph view.
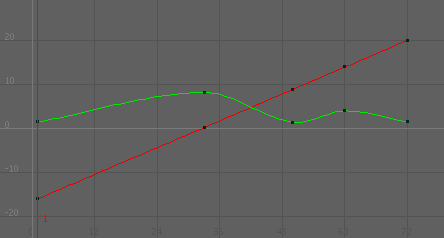
The green curve represents Translate Y, while the red represents Translate X. The color of each curve matches its attribute name. This color scheme is consistent throughout Maya for X, Y, and Z (red, green, blue).
If you’ve never used a graph editor before, the relationship between a curve’s shape and the animation it represents might be hard to understand. With experience, you’ll quickly recognize how curve shape affects animation.
In the above graph, the straight curve of Translate X indicates that the ball moves horizontally across the ground at a constant rate over time.
The wavy curve of Translate Y indicates that the ball increases its height steadily until frame 33, dips more quickly until frame 50, then rises and dips again until frame 72.
When the ball first bounces off the ground at frame 50, it seems to float and slip rather than rebound. The shape of the Translate Y curve illustrates why. Near frame 60, the curve is soft and rounded. The Translate Y values gradually decrease to the low point then gradually increase. The transition from decreasing to increasing values is smooth.
The Graph Editor’s usefulness lies in the fact that you can edit the shape of the animation curves to edit the animation of any keyed attribute. To create a sharp bounce, you can edit the curve so that the transition from decreasing to increasing values is abrupt at frame 50. Specifically, you’ll create a corner at that key point rather than a rounded curve.
Select the point on the Translate Y (green) curve at frame 50.
This causes a pair of tangent handles to appear at the point. Each end point of the newly displayed straight line is a tangent handle. The handles let you control the curvature near the key point.
Animation curves have a few control structures for curve editing. You can do any of these operations:
Use the Move tool and middle mouse button to move a key point. You can alternatively use your keyboard to enter precise values for a selected key’s frame and value in the boxes above the graph area.
Use the Move tool and middle mouse button to drag the tangent handles and change the adjacent curvature.
(You can shift-drag with the Move tool to constrain a move operation to a single direction.)
Use the Scale tool and middle mouse button to scale selected key points closer together or further apart.
Use the Graph Editor’s Tangents menu items to change the adjacent curvature. This is the operation you’ll use in the next step.
In the Graph Editor, select Tangents > Linear.
This changes the curvature around the key point from rounded to cornered. Specifically, the setting you select specifies how the key point tangent handles lie at this key point. This affects the type of interpolation between key points.
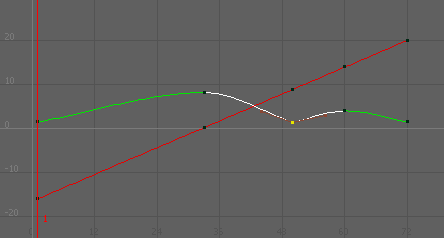
Play the animation and you’ll see the ball bounce more sharply.
To sharpen the bounce more, you need to edit the positioning of the tangent handles to steepen the curvature approaching the key point.
Select one of the tangent handles.
Select the Move Tool and then use the middle mouse button to drag the tangent handle upwards a little so you can see the how the curvature at the key point changes.
By default, when a pair of tangent handles share a key point, they work as a unit. Move one and you move the other in an opposing direction. This is often desirable in an animation curve, because it ensures the curvature at that point stays symmetrical. Symmetrical curvature often helps prevent unusual animation shifts.
In this case, however, you want to steepen the curvature’s approach toward the curve point in the same direction on both sides. You therefore need to break the symmetrical interdependency between the two tangents.
Undo your previous move of the tangent handle.
Select the key point at frame 50 (not a tangent handle).
In the Graph Editor, select Tangents > Break Tangents.
This lets you move each tangent handle independently.
Select the right tangent handle and use the Move Tool to move it up a little. Do the same for the left tangent handle. Be careful not to select the key point.
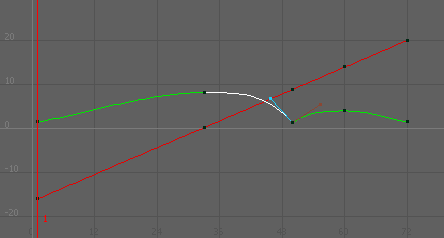
This sharpens the bounce to better simulate the effect of gravity and elasticity.
[5] Changing the timing of an attribute
The ball seems to move too slowly in its journey. In the following steps, you’ll use the Graph Editor to hasten its movement. Specifically, you’ll cause the ball’s animation to finish its journey in two seconds (48 frames) rather than three (72 frames).
TIP:
Widen the Graph Editor window as necessary to see the graph clearly. Also, dolly the view or select View > Frame > Frame Selection (in the Graph Editor window).
To speed up the animation of the ball’s movement
Drag a selection box around all key points of both curves.
Select the Scale tool.
Click and hold the middle mouse button anywhere in the graph at frame 1 (slightly to the right of 0).
Notice the question mark icon. The location of this icon indicates the point from which scaling occurs. (Because you need to scale the animation inward toward frame 1, you need to start your drag operation at frame 1.)
Without releasing the mouse button, drag to the left until the right-most key points on both curves are positioned roughly at frame 48. (When selected, the right-most key points are yellow.)
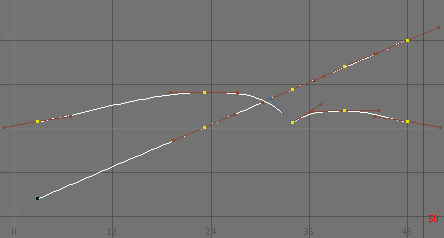
NOTE:You can also use the Region Tool to scale your curves. Select the Region Tool from the Graph Editor toolbar, select the region of curves you want, then drag the region handles (white boxes) to scale.
This scales the curves symmetrically towards frame 1. The animation of the ball now plays from frame 1 to 48 rather than 1 to 72. The ball traverses the scene in less time, which, of course, means it moves faster.
If you had started your drag operation from the middle of the frame range, the scale operation would have pulled the curves toward the middle of the frame range. You can snap the keypoints to whole values to keep the keyframes on a consistent timing.
[6] Fine tuning an animation
Now you can improvise adjustments to the animation on your own. For example, you might choose to speed the ball’s horizontal movement up to the first bounce but not thereafter. You might also decide to raise the peak height of the ball’s motion so that it doesn’t seem to hover over the fence unrealistically.
Whatever you choose to do, you’ll likely need to edit both the Translate X and Translate Y curves, not just one of them. Play the animation after each adjustment.
The following two figures show examples of curves after modification. The two graphs are identical, except the curve points are selected in the second figure. The second graph shows the position of the tangent handles.
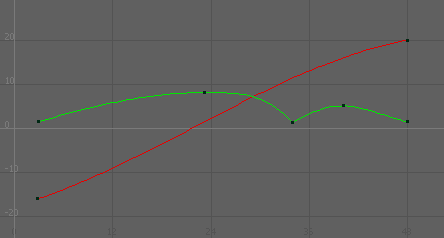
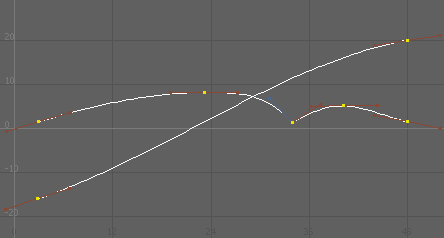
If you want your curves to match the shape of the curves in the above figure, here’s what you would need to do:
To adjust the animation curves to match the above images
On the Translate X curve, delete the three key points between the two key points at the end. To delete keys, select the key points and press Delete. (The preceding figures show the curve after the points were deleted.) To delete the points, drag a selection box around them and press Delete.
With fewer key points on the curve, it’s easier to maintain the curve’s smoothness for larger distances as you edit its shape. Small kinks in an animation curve can ruin an otherwise perfect animation, so it’s useful to remove key points that you aren’t using.
On the Translate X curve, select the left-most key point and move its right tangent handle down slightly. (Remember to use the middle mouse button when moving a handle or point.) Select the right-most key point and move its left tangent handle up slightly.
Notice that the slope of the Translate X curve increases slightly in the early part of the animation, then tapers off toward the end. This causes the ball to accelerate slightly at the beginning of the animation, then decelerate after its first bounce.
On the Translate Y curve, remove the key point at frame 22. (The preceding figures show the curve before the point was removed.) This point wasn’t essential to the curve shape.
On the Translate Y curve, select the left-most key point and move its right tangent handle up slightly.
At the key point where the bounce occurs on the Translate Y curve, move the left tangent handle up a bit. This raises the high part of the curve left of that key point, which makes the ball rise higher over the fence.
If you want to change the shape of Translate Y curve but lack adequate control with the existing key points, you can add a key point at the position of your choice. (No key points were added in the prior figures.) To add a key, click the Add Keys Tool icon

, select the curve, and middle-click the desired position on or off the curve.
[7] Deleting extra keyframes and static channels
As you set keys, you often create many unintended keys. For example, when you used the Set Key operation on the ball, Maya created keys on all transform node attributes of the ball, for instance Rotate Z, not just the intended Translate X and Translate Y attributes. The curves representing such attributes have unchanging values. The attributes are known as static channels.
You can identify static channels by examining animation curves in the Graph Editor. If a curve is horizontally flat its whole length, the value of the attribute it represents isn’t changing. The attribute is a static channel. Static channels slow Maya processing, so it’s beneficial to remove them in complex scenes.
To delete static channels
- From the main menu, select Edit > Delete by Type > Static Channels.
This deletes all unnecessary keys for all objects in the scene.
In addition to static channels, you’ll often create excess keys—keys that aren’t being used to control the shape of a curve. Whenever you see three key points that lie in a straight line, the one in the middle is unnecessary. For example, in this lesson’s original Translate X curve, there were four redundant keys:
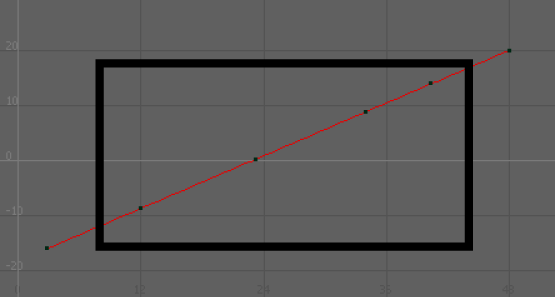
When you remove redundant key points, the shape of the curve doesn’t change and you speed up Maya processing.
[8] Using Playblast to playback an animation
When you play a scene, you see a rough approximation of the animation. The playback speed and quality is imprecise as compared to rendering each frame and playing the frames in sequence with a playback utility specifically designed for this purpose. The reason for this is that Maya processes the animation of each frame before display, while a playback utility simply plays previously processed and rendered images.
The more detail that Maya needs to process, the slower the playback. For example, playback will likely be slow for any scene that has several complex objects displayed with Smooth Shade All and Hardware Texturing.
To preview the animation with more accurate timing
Select Window > Playblast.
For the next several seconds, Maya processes the entire animation frame by frame. When the process is complete, a playback window appears.
Click the play button in this window to watch the animation.
Close the Playblast window when you’re done.
[9] Beyond the lesson
In this lesson, you learned how to:
Set keys for attributes, then use the Graph Editor to refine the animation and remove unnecessary keys. This is a typical workflow when keyframing.
You can animate most any attribute in Maya, not just the Translate, Rotate, and Scale attributes of a surface. For example, you can animate the intensity of a light, the transparency of a surface, the rotation of a camera view, or the position of CVs.
Work with the Graph Editor to adjust the animation attributes animation curves directly.
The Graph Editor is the best tool for editing keyed animation by reshaping animation curves. You can use it to change key positions, add or remove keys, and alter the fluidity and symmetry of animation.
Each key point on an animation curve has a Tangent setting that specifies the curvature leading into that point. The default Tangent setting (Auto) creates rounded curvature—useful for animating attributes that change smoothly over time. The Linear setting creates angular curvature, useful for a bounce effect or any other abrupt change in attribute value. Other Tangent settings are available for different animation effects. For example, a Stepped setting lets you make an instantaneous leap in value, useful when you want to flash a light off and on.
Use the Time and Range slider to play back your animation.
Although the Graph Editor is a popular animation tool, you can also cut, copy, paste, and delete keys directly in the Time Slider to edit animation. Select a key position in the Time Slider, then right-click to select the desired operation from a pop-up menu.
You may find the following techniques useful when keyframing your animations:
There are alternative object display modes that quicken the display of animation in the scene view. When you select Shading > Bounding Box (from the panel menu in the scene view), Maya displays simple box-shaped geometry in place of the actual objects in your scene. The simpler shapes enable Maya to respond to any camera and object movement faster. The drawback is that you cannot edit the shape of the objects in this display mode.
It is generally a recommended practice to animate a parent (group) node rather than objects themselves. By animating a parent node, you can avoid problems that occur when the animation of one object in a hierarchy conflicts with the animation in another part of the hierarchy.